Since most MacBooks are SSD-only, one would think Apple would be careful about leaving junk around on the drive. But many people are finding 5 GB wasted for a years-old leftover Mac OS X install image! Here’s how to reclaim that space if you’re missing it…
Lost+Found
In a brief DuckDuckGo search, I discovered that it’s fairly common for a Mac OS X upgrade to leave behind a large (4-6 GB), useless image file. Although you may not have this issue, it’s not unusual! Leave a comment and let me know if you find something like this.
Most UNIX file systems, including HFS+ in Mac OS X, have a special directory called “lost+found” for disassociated data found during file system checks. And Mac OS X upgrades apparently often leave a copy of the install image in just this state. Here’s how to find out if you have such a leftover image, verify that it’s not needed, and remove it:
- Open Terminal
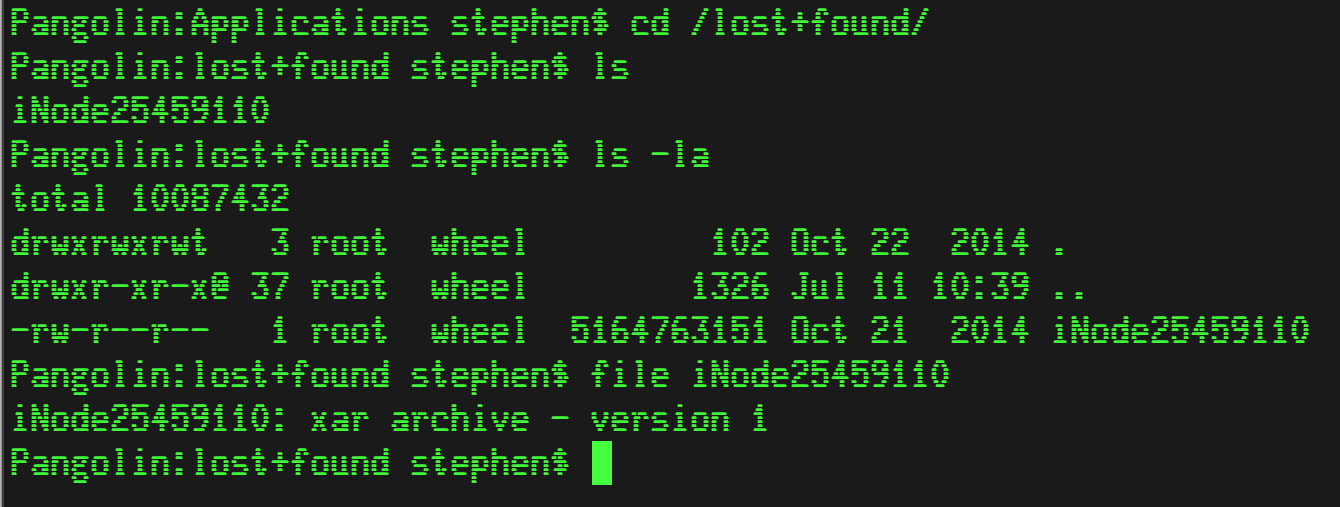
- Type the following to see what’s in the lost+found directory:
ls -lrSk /lost+found
- There could be all sorts of stuff in there, most of which is junk. But you’re looking for something big. That combination of flags on the ls command will sort by file size, from smallest to largest, so the install image should be at the end of the list.
- If you found a large file (more than 9 digits in the size field means gigabytes in size) from a while ago, it might be a leftover install image. Use the “file” command to find out what kind of file it looks like:
file /lost+found/iNodeNNNNNNNN
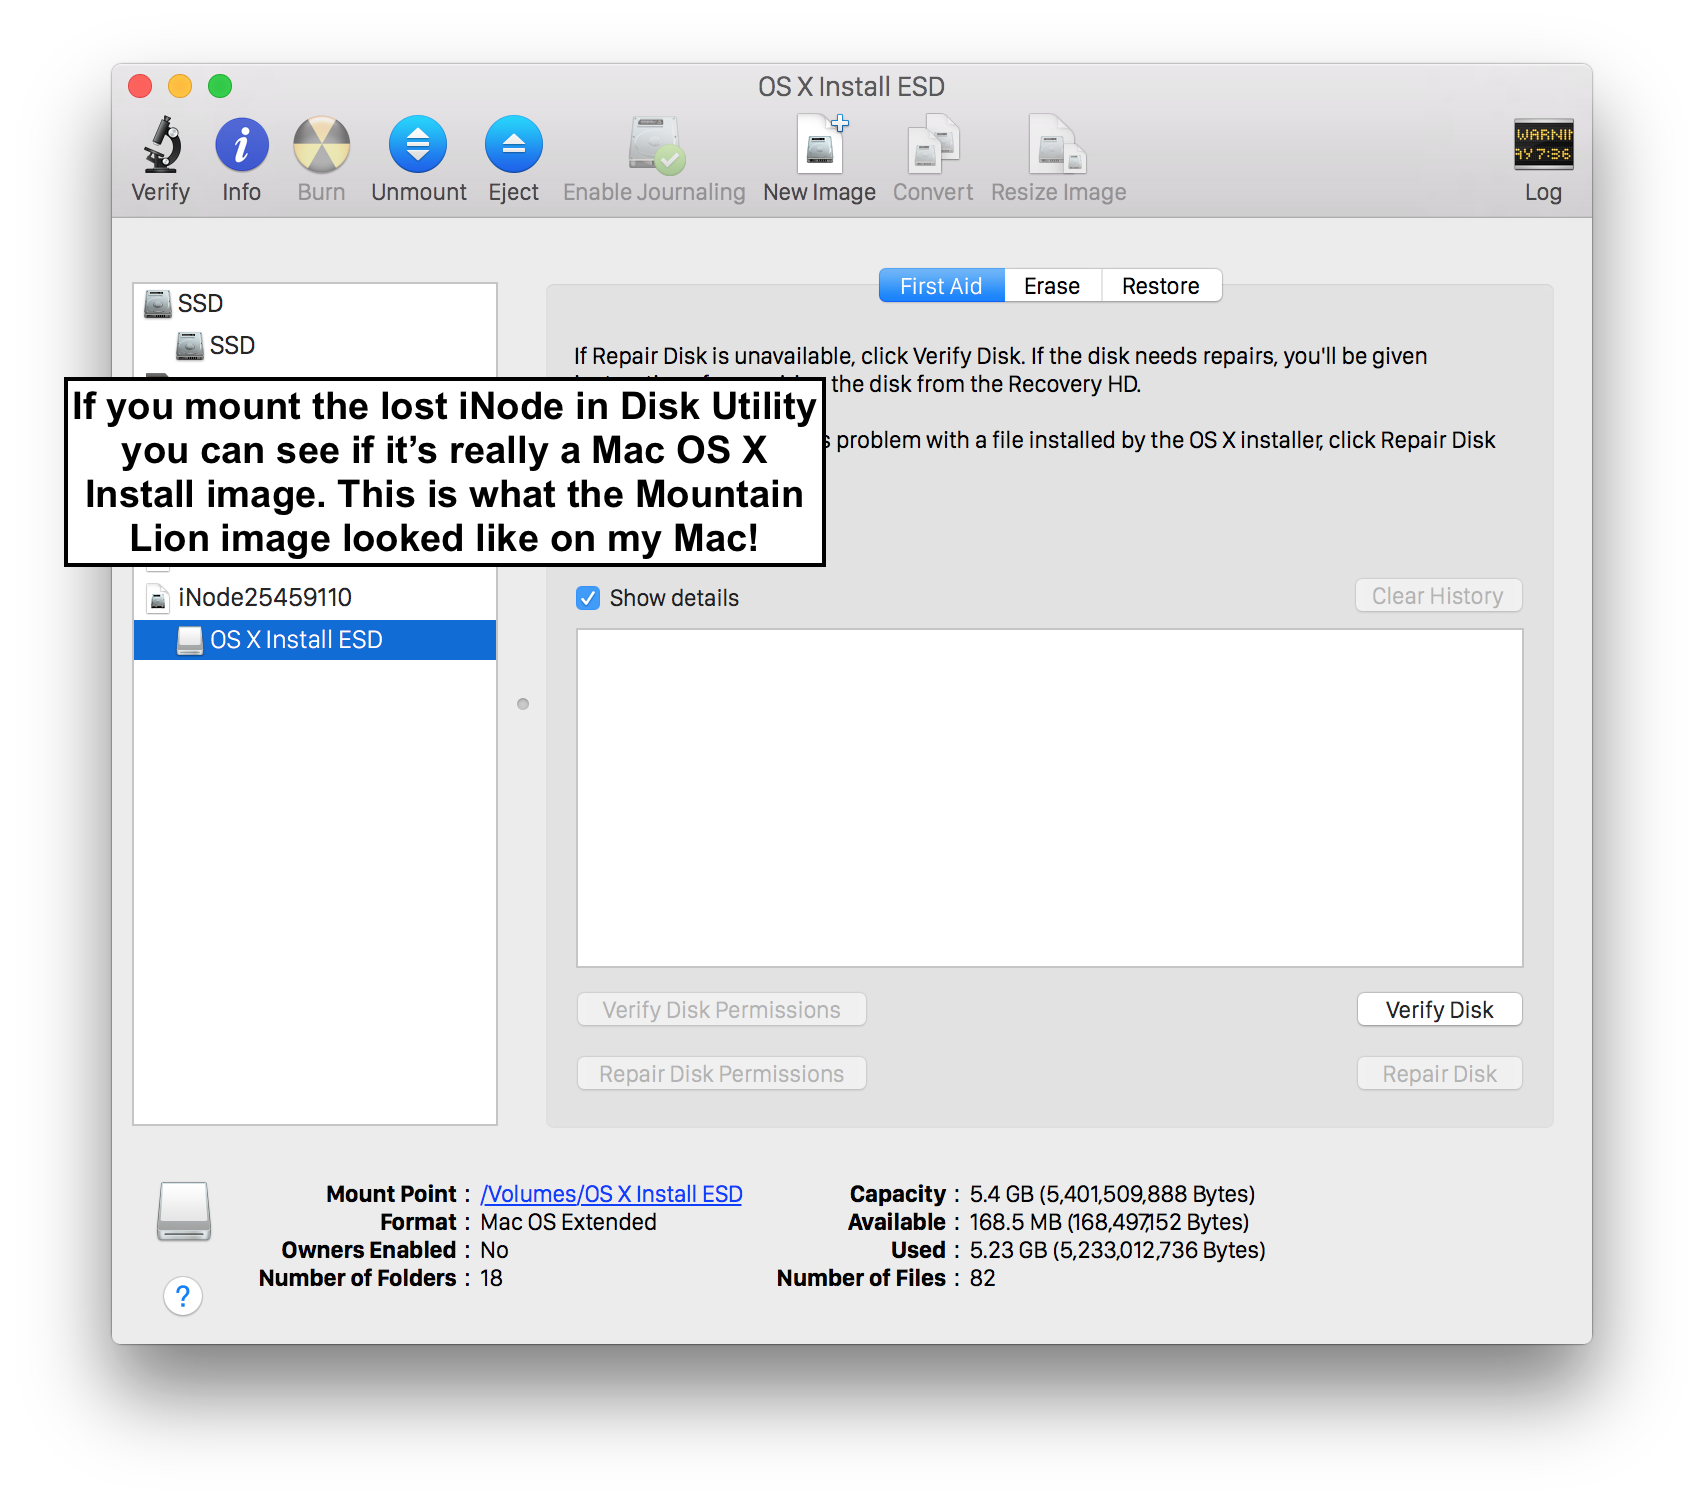
- If it reports that the file is an “xar archive” there’s a very, very strong chance that it’s a leftover Mac OS X install image. You can be absolutely sure by mounting it in Disk Utility and seeing what it says. But if it’s an xar archive in lost+found you can probably safely delete it without checking:
/bin/rm -f /lost+found/iNodeNNNNNNNN
- You just reclaimed 4-6 GB of precious SSD space!
There could be lots of other orphaned files in lost+found, and you could probably delete them. Or you could check and see if they’re that novel or precious family photo you thought you lost. It’s really up to you!
A Bit of Background
Now that you’ve gone through that, here’s a bit of background on what this is all about.
First, let’s talk about “lost+found”. Modern file systems use a system of pointers to connect directory information to file contents. It’s a bit like a phone book: The directory links the file name and location information to the underlying data. There are three essential items: The logical name and location, the unique number, and the contents.
If you have an unlisted phone number, it still exists but can’t be found in the directory. The same is true of a file system: Remove the directory listing and the number and file contents can still exist, but they’re no longer usable.
A standard file system check (which Mac OS X will perform on its own sometimes on boot) will sometimes fine a “lost” inode and file with no directory information. So an entry in “lost+found” will be created in case someone comes looking for it.
There’s another interesting thing that can happen with files: They can have more than one directory link! See the number next to the permissions (“-rw-r–r– 1”) in my listing above? That’s how many directory listings link to this inode! Just as a phone can be listed multiple times in the phone book, so too can a file have multiple directory listings. This is how Time Machine works, and explains why sometimes when you “delete a file” (really remove the directory entry) you don’t get any space back. Only when an inode has no more directory entries is it truly deleted.
If you’re wondering what exactly an “xar archive” is, it’s an open source disk image format used by Mac OS X since 10.5. I talked a bit about disk images in my post about sparse bundles if you’re interested in learning more about that.
Stephen’s Stance
It’s kind of surprising that Apple would leave around such a huge lost inode after a Mac OS X upgrade. A MacBook Air with a 128 GB SSD would see 4% of the total storage space taken up by this useless blob! Delete it and get on with life!
I checked my three Macs. One (running 10.10.5) had an empty /lost+found. The other two, running 10.10.4 and 10.11 Beta, didn’t even have a /lost+found. It may just be you…
Check out disk inventory X (it kindof outdated but works perfectly well for visualizing and cleaning OSX disk)
http://www.derlien.com/downloads/index.html
I had this under 10.10 and it mounted as OS X Install ESD. Didn’t look too closely to see whether it was Mavericks, or Yosemite, but I’m deleting it!
I don’t have a /lost+found directory at /Users/username on El Capitan
If the ‘file’ command reports the iNodeXXXXXX file is a xar archive, then you can avoid having to mount it in Disk Utility to examine the contents. Simply run the following command to examine the content list without unarchiving it…
xar -t -f /lost+found/iNodeXXXXXX
If near the top of the content list you see “InstallMacOSX.pkg” several times, followed by a bunch of lines starting with “Resources”, then this is almost certainly the Mac OS X installer or updater. Mine was 4.3GB.
What if it’s NOT an archive file? I have 3 of them, between 5 & 6 gigs each, and they’re all showing up as text files. (It would be REALLY great to have this space back.)
I just used, Space Gremlin, which is another drive data storage visualization tool and it revealed a Lost +Found directory that had two iNode files with two different numbers appending the iNode file name. One was 5.6GB and another was 5.3GB.
I’m currently on OS X El Capitan 10.11.6
I remember after upgrading to Mavericks, I started losing a lot of storage rather quickly and thought it had something to do with temp files and DropBox or Google Drive, but it turns out these iNode files were a major factor in that issue as it matches the “approx. 10GB” that all of a sudden was eaten up.
Space Gremlin (probably other disk storage tools as well, and/or probably some terminal commands) will also reveal Restricted Files, which I just learned are temporary local backup files OS X creates if you use Time Machine to backup and haven’t backed up to an external drive in quite some time. It starts generating these backups automatically and these can also consume a large amount of disk storage but will not really show up in your normal finder windows.
deleted