As I mentioned in my previous post about Raspberry Pi power monitoring, I recently built a VMware vSphere “datacenter” from three Intel NUC mini PC’s. One limit of the NUC is that it has just one Ethernet port. But there’s a Mini PCIe slot inside the fourth-generation NUC that can be used to add a second Ethernet NIC! Here’s my story.
A Bit About the Intel NUC Hardware
Intel’s NUC (“Next Unit of Computing”) hardware is a mini PC roughly the size of a current Mac Mini. It is designed to support a variety of end user computing applications and functions as a tiny desktop PC for most people. But as many have noticed, it can also support VMware vSphere and similar server workloads! That’s how I’m using it.
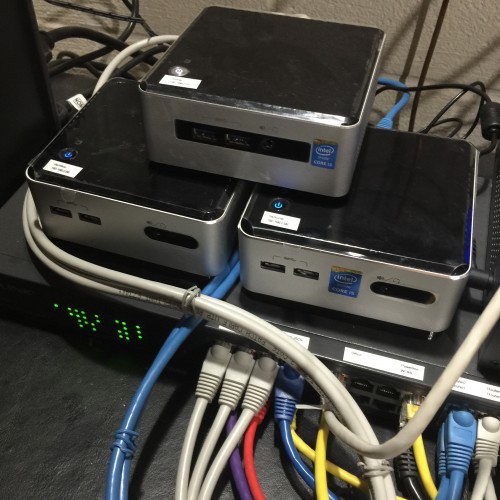
I love that the NUC is stable, low-power, compact, and well-supported. I connected three NUCs and a TP-Link 24 port managed Ethernet switch to my CyberPower UPS and the whole setup is drawing less than 60 watts! Plus, it’s quiet and cool and fits in a corner of my basement wiring closet. Score! Although the NUC is limited in RAM and peripheral expansion, these factors make them more attractive for home use than “real” PC’s, even compact ones.
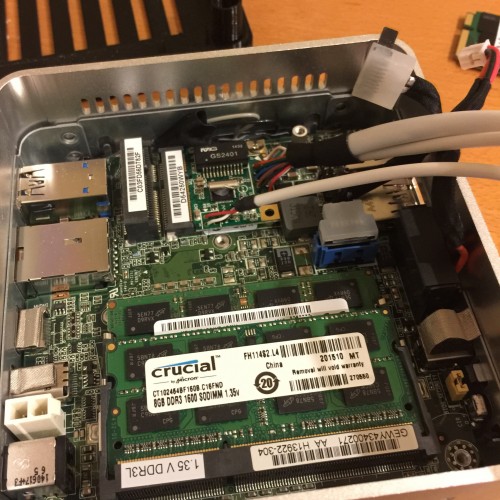
The NUC has reasonably good laptop CPUs, including the latest i3, i5, and i7 models in dual-core variants. It includes two SODIMM slots (1.35 volt), currently supporting a maximum of 16 GB of RAM. Most NUC models are available with space for an internal laptop SATA hard disk drive, and all support some kind of internal SSD as well.
That SSD port is where things get interesting. The first four generations of NUC motherboards sported two Mini PCIe slots: One full length slot on top for mSATA SSDs and another half-length slot below, ostensibly for a Wi-Fi card. Instead of Wi-Fi, I added a wired Gigabit Ethernet NIC in that slot to give my NUCs two Ethernet ports rather than the standard single one.
mSATA, Mini PCI2, and M.2
Let me digress for a moment on Mini PCIe, mSATA, and a new standard called M.2. As I’ve covered before, mSATA is simply a SATA SSD packaged using the same form factor and pinout as a Mini PCIe card. Many modern laptops and small form factor PC’s (and even some full-size PC’s) come with one or more Mini PCIe slots on the board for adding Wi-Fi cards or mSATA SSDs and these can often be used to add additional PCIe Ethernet cards instead. Such is the case of the first four generations of Intel NUC.
Lately, however, the PC industry has adopted a new, even smaller form factor called M.2. On paper, M.2 is way better than Mini PCIe: M.2 has four PCIe 3.0 lanes plus 6 Gbps SATA and USB 3 all packed into that tiny connector! The old standard had a single PCIe 2.0 lane and USB 2.0, plus SMBUS and GSM SIM and such. Plus, the M.2 connector is substantially smaller, taking up less space in today’s super-thin laptops.
Unfortunately for hobbyists, M.2 is brand new and only SSDs and Wi-Fi NICs are available at this point. This means that buyers of fifth-generation Intel NUCs, which have two M.2 slots instead of two Mini PCIe slots, are limited in what they can add internally. Your SSD will be much faster, but you can’t add a wired Ethernet port at this point. I have seen M.2-to-Mini PCIe adapters on the Internets but I doubt these would fit in a NUC.
Adding a Mini PCIe Ethernet Adapter to a NUC
Now back to our discussion! It’s fairly straightforward to add a second Gigabit Ethernet port to your first- through fourth-generation Intel NUC. Just buy a half-length Mini PCIe Ethernet adapter like this Syba Realtek device on Amazon for just $16 and slap it in there. It works perfectly and there are drivers available for most operating systems, including VMware ESX!
The issue is that the Syba card is too tall to also install a mSATA SSD in the NUC and the bulky triple cable it uses doesn’t fit nicely along with a SATA HDD in the little NUC body.
The first problem is solved through the use of solder. I de-soldered the 10-pin Ethernet and 4-pin LED headers on the tiny NIC with my handy de-soldering iron and then pulled the pins out with pliers. I then soldered the Syba cable directly to the board, cutting off the connectors and tinning each little lead. I was careful to solder the wire low and slanted towards the back to allow the cable space in the cramped NUC and cut off the excess afterwards. And I used some plastic to keep everything from shorting out inside.
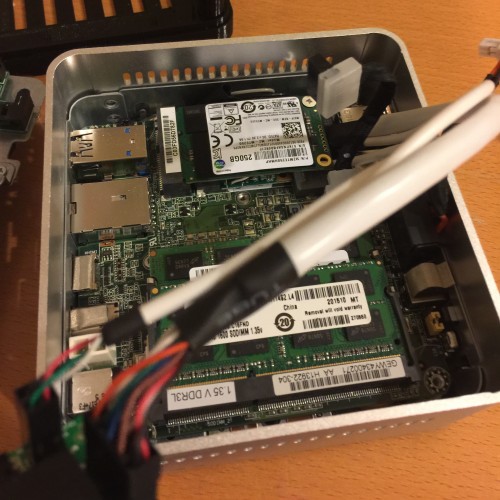
This gave just enough room to re-install my mSATA SSDs (I picked Samsung EVO because Microcenter had them on sale). But there is still the issue of routing the surprisingly bulky wires out of the case and locating the Ethernet connector. Nick solved this by soldering his own Ethernet pigtail directly to the Syba card, but I wanted to retain the RJ45 connector and activity lights.
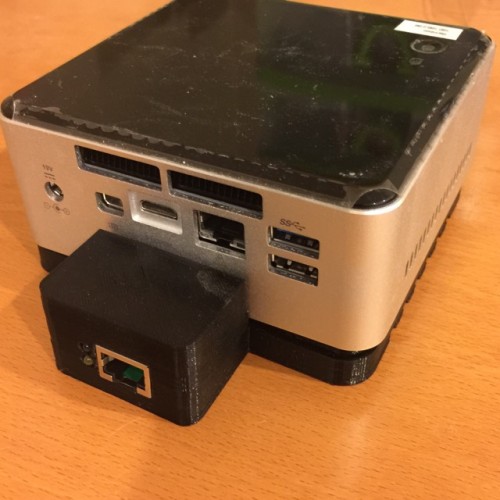
So I went to Tinkercad and created a new base for the NUC, complete with a spot for the hard disk and controller and the Syba Ethernet connector. I then printed this out on my AIO Robotics Zeus 3D printer and, after some tinkering, got the whole thing to work! I’ve placed these on Thingiverse if you’d like to print one, too, but be warned that although it works, it’s still not perfect. And it’s a large, time-consuming print that might not fit on a Makerbot platter!
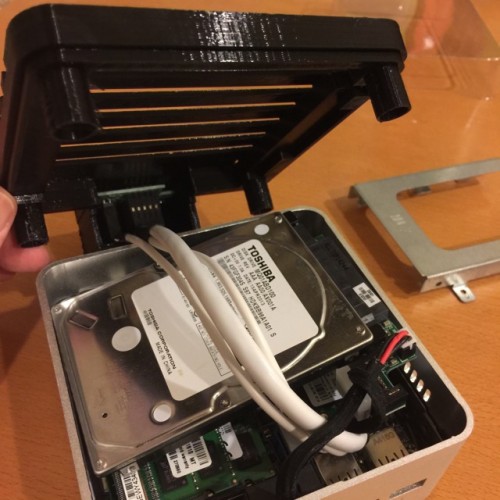
The hard disk drive and controller must be removed from the steel carrier that comes with the NUC (six screws and you’re done) and the Ethernet wires must be carefully routed around the disk. But everything does fit in place, and the NUC sits nicely closed afterward.
VMware ESX 6.0 and the Intel NUC
Happily, VMware added drivers for the Intel e1000 Gigabit Ethernet adapter found on all recent NUC motherboards to the standard set in ESX version 6. This means that it’s simple to install ESX on a NUC! No more creating a custom install! Just follow VMware’s directions to create a bootable USB drive and it’ll boot up perfectly on the NUC.
Once you’ve installed ESX on the USB drive, you might notice that the SATA and Realtek NICs are not detected. You need to install drivers for these. Happily, Andreas Peetz over at v-front.de maintains a depot of the correct drivers and you can install them from the command line in ESX! Just enable SSH and connect using your favorite terminal. Then install the drivers:
esxcli software acceptance set --level=CommunitySupported
esxcli software vib install -d http://vibsdepot.v-front.de -n sata-xahci
esxcli software vib install -d http://vibsdepot.v-front.de -n net55-r8168
Or something similar… You’ll get it. The SATA-XAHCI driver supports both the mSATA SSD and the SATA HDD in the NUC. The R8168 driver works with the R8111 chip in the Syba Ethernet NIC.
Stephen’s Stance
I hope this has been interesting and helpful to those wishing to use Intel’s NUC in a simple, low-power home “datacenter”. The Syba/Realtek NIC works great! Sadly, there’s no such solution for the fifth-generation Intel NUCs, so it’s best to stick to the older models for now. If there’s interest I might discuss my configuration next.
Stephen – Here’s some M2 adapters that may help with the newer NUCs. http://www.bplus.com.tw/M.2.html#M2_Extender
M2 to PCIe is probably the most interesting. It has a ribbon cable so you could put the card external. (http://www.bplus.com.tw/ExtenderBoard/P11S-P11F.html)
thanks much better, nice solution without having to create a custom image, but I ran into an issue installing the vibe files. I found the connection is to use the -v and not -d.
esxcli software vib install -v http://vibsdepot.v-front.de/depot/vft/sata-xahci-1.30/sata-xahci-1.30-1.x86_64.vib
Many thanks
Nice Lab and demo how to solve the NUC second nic and peripheral expansion, I also have 3 NUC with second nic and now i planing add msata SSD. Can you help me print three more of new NUC base? i will pay u for it, Because i no 3D Printer….
Hi, is it possible to get the 3D Data from the NUC-Base. A friend of mine got a 3D-Printer…. Thanx i. a. Thomas
I did this. I got a 4th gen NUC off ebay (pretty durned cheap). I printed your base on Shapeways (about $50). Observations.. I’m an experienced solderer, but getting the pins out of the tiny mPCIe card was not easy because it was too small for my clamp but I got it done and the ethernet port still works. My trick was to pull the plastic off the connectors first so you can deal with the pins one by one. Heat the short end and pull the long end out with pliers. Clean up with wick. The existing screws don’t hold the base on. A trip to the hardware store is in order. I have a four more to do to NUCify my server closet and get some space back. I think I’ll do a deeper base using yours as a starting point. Then I can hold the drive firmly, add retainers for the ethernet wire and not have to pull the connectors off the NIC. I began by thinking “someone must do a base for a NUC to add a second ethernet or drive”. So googling got me here. A most excellent hack.
Hello.. This is a good Intel NUC.. and Good
Article, as I also looking for this product. However, I want to ask whether the
offering price from http://www.itosa.co.id/
Is good enough or not ? please kindly advice me, Thank
You..
Hello.. This is a good Intel NUC.. and Good
Article, as I also looking for this product. However, I want to ask whether the
offering price from http://www.itosa.co.id/
Is good enough or not ? please kindly advice me, Thank
You..
I am going to experiment a bit with a NUC and VMWare too. Will the NUC unit support a 4TB or 6TB 1.8-inch SATA disk?
You didn’t mention the reason for the 2nd NIC, but I thought I’d mention that your readers could save themselves the effort and just use VLAN’s especially seeing as this is just a home network/lab env and likely don’t need redundant links. Also hard to imagine needing > 1Gbps networking using NUC’s. The requirement to run older hardware also wouldn’t apply (other than potential driver issues with esx).
Here’s a how-to including vswitch configurations: https://blogs.vmware.com/smb/2014/03/back-basics-creating-standard-vswitches-part-one-three.html
Check this out
http://www.newegg.com/product/product.aspx?Item=N82E16833114054
Really cool idea. I want to do something similar with my hacked Asus Chromebox to turn it into a pfSense box, but I am rather opposted to Realtek NIC’s, as they aren’t exactly the most reliable.
I found this dual i210 mini pcie ethernet card, but after contacting the distributor, no one has gotten back to me yet 🙁 It’s too bad these things appear to be b2b only.
http://www.nexcom.com/Products/industrial-computing-solutions/pc-based-factory-automation/minipcie-module-expansions-lan/minipcie-module-expansions-nisk300lan-kit/
Hi Stephen. This is really a kind of a thank you, as this article inspired me to come up with a solution for my 3rd Gen NUCs. Since I am not handy with the soldering iron, I went the route of a Mini PCIe extender and some modifications to you 3D base. http://www.devtty.uk/homelab/NUC-Squarepants/
Since then, I have also ported a couple of USB 3.0 NIC drivers to ESXi (ASIX and Realtek). I don’t really like the untidiness of the USB dongles, but they are simpler to deploy and cheaper. http://www.devtty.uk/homelab/Want-a-USB-Ethernet-driver-for-ESXi-You-can-have-two/
Once again, thanks for the great post and inspiration
Finally – some zero footprint systems with dual NICs are starting to appear like the Zotac Zbox’s: https://www.zotac.com/us/product/mini_pcs/zbox-ci323-nano
Realtek nics, though 🙁 Hopefully someone will step up with a dual Intel NIC box here.
Hello,
We True Networks make second NIC for NUC5i5MYHE model few month ago,
You can find out about it @ https://nucserver.wordpress.com/2016/04/17/nucserver-hardware-development-project-status/
You can also find about NUCserver project which NUC turn to Server.
Wouldn’t it have been easier to buy an msata ssd in half size, put it in the bottom PCIe mini slot and then put a full sized ethernet card in the top PCIe mini slot?
I know this is quite old but what’s with this statement:
“Intel’s NUC (“Next Unit of Computing”) hardware is a mini PC roughly the size of a current Mac Mini.”
?
I mean – mac minis are like 4 times (by volume) bigger… even when you factor the external PSU NUCs are still 2x smaller… See those pics:
https://cdn.fptshop.com.vn/uploads/images/tin-tuc/108755/Originals/33447-61173–l.jpg
https://cdn.fptshop.com.vn/uploads/images/tin-tuc/108755/Originals/33447-61170-NUC-and-Mac-mini-top-with-power-supply-l.jpg