Apple Photos isn’t the best application to manage a large digital photo library, but the integration with iCloud, iOS, and macOS is extremely useful. But even though Photos can process and store raw images, it is severely lacking in terms of library management: Smart folders don’t properly recognize them and there’s no easy way to remove them from your library so these huge files can seriously clog up your iCloud account. I have developed a workflow to remove raw images from Apple Photos and iCloud and thought I’d share it. Hopefully Apple will do better in future releases.

How Photos Stores Raw Files
Although I don’t love the slim editing features in Photos, I’m still using it because of the excellent integration between iOS, macOS, and iCloud. It’s just plain useful to have all of my photos stored together and seamlessly synced to the cloud. Still, Photos is pretty terrible when it comes to dealing with raw images.
In macOS, Photos stores all images in a bundle. By default this lives in your Pictures folder and is called “Photos Library.photoslibrary”, though macOS hides the extension so it just looks like “Photos Library” in Finder. A macOS bundle is actually just a regular folder marked so as to be treated like a single unit in Finder.
Inside the library, all photos are stored in Masters/year/month/day/event/file. For example, if you take photo with your iPhone on July 10, 2017, it might be called “Masters/2017/07/10/20170710-12304/IMG_2356.JPG”. If you import a raw+jpg image from a camera (in my case, my Leica Q uses “.dng” files for raw), it will be stored similarly, perhaps called “Masters/2017/07/10/20170710-17385/L123521.JPG” and “Masters/2017/07/10/20170710-17385/L123521.dng”. Note that both the jpeg and raw files are stored together in the same directory.
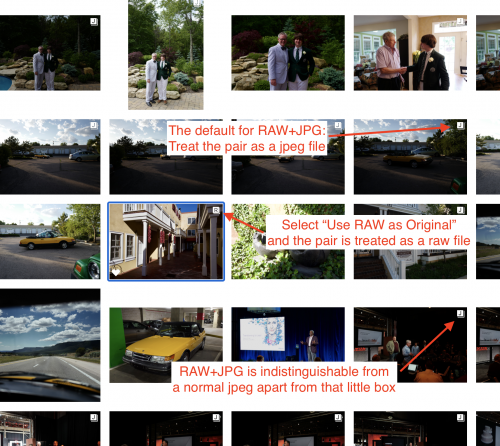
Although Photos does a nice job of keeping these paired photos together, it entirely drops the ball when dealing with them in the UI. Photos treats raw+jpg images as a single entity but only accounts for the primary or “Original” source. By default, raw+jpg files are treated as “JPEG” by the UI and are thus indistinguishable from plain jpg files from the same camera except for a little stacked “J” icon in the upper right corner. If you edit the photo and select “Use RAW as Original” in the Image menu, it becomes a stacked “R” and can be matched by Smart Folders.
This is asinine:
- Smart Folders has a “Photo is Raw” search, but this only works then the “Use as Original” source is raw (which has to be done manually, one photo at a time)
- Smart Folders “Filename ends with…” search also only finds the “Use as Original” source
- Thus there is no automatic way to identify raw+jpg files since they are by default treated as jpg files
- The only way to know which files are raw+jpg pairs after import is to look for the little “J” box in the corner
At least if you “Export Unmodified Original” it will export both the raw and jpg files regardless of which was marked as “Original”!
Raw Files in iCloud Photos
Apple Photos happily uploads both the raw and jpeg files to iCloud Photos for you, and will download them to any Mac connected to the account automatically. And Apple will generate a jpeg file for viewing on iOS devices too. This is good.
The problem is that these raw files can quickly clog up your iCloud account and there’s no way to get rid of them short of deleting the image from the library. This is bad. Considering that every raw image from my Leica Q is 41 MB, my 200 GB iCloud account quickly filled up!
There ought to be some way to clean out your library, exporting the unwanted raw files and removing them from iCloud without deleting the companion jpeg files. But that’s really hard to do.
Warning: The following processes can cause the loss of your precious photos if not done correctly! Proceed at your own risk and make a backup first! In fact, make two or three backups!
Frankly, since Photos can’t automatically select which jpeg images have a “raw companion” users of raw+jpg are really in for a tough time. The only way I can see to clean out your raw+jpg files in Photos is as follows:
- Manually select all raw+jpg images you want to clear out, using the little “J” box in the UI as your guide
- Export Unmodified Originals to an archive folder, giving you a copy of both the raw and the jpeg file but not any modifications you’ve done
- Export (modified) Photos to another archive folder, giving you a jpeg with your changes so you can bring those back into your library
- Delete these photos from your library using Command-Delete (why is there no corresponding menu item?)
- Really delete these photos by clicking on Delete All in the Recently Deleted folder
- Wait for iCloud Photos to sync, then exit and reopen the library and wait for it to really remove the photos which strangely only seems to happen after reopening (Is this a bug or a feature?)
- Watch the size of the library in Finder to make sure the photos are really, really deleted from the library, then wait some more to make sure they’re really, really deleted from iCloud
- Import the modified jpeg photos from step 3 and manually tag them, add them back into your albums, and so on
This process is painful and incomplete: There’s a lot of manual juggling and you will lose your tags, albums, and categorization. But at least your iCloud library will be smaller.
A (Somewhat) Better Way With PowerPhotos
I’ve long used Fat Cat Software’s PowerPhotos (formerly iPhoto Library Manager) to split and merge iPhoto and Photos libraries. Although it doesn’t solve the problem of finding and exporting raw+jpg images, it does automate the tagging and photo import process so you won’t lose as much when you jump through these hoops.
Here’s my improved way to clean raw+jpg files out of Photos, leveraging PowerPhotos:
- Manually select all raw+jpg images you want to clear out, using the little “J” box in the UI as your guide, and put them in a (dumb) album called “Raw Photos To Archive” or something
- Create a Smart Album with “Album is not Raw Photos To Archive”, then create another (dumb) album called “Photos Not Archived” or something so this selection will persist after you delete the others
- Make a copy of the whole Photos library by holding down Option while dragging the library to an archive folder then rename this something like “Raw Photo Archive”
- Close Photos and open the copy Raw Photos Archive library, then select all Photos Not Archived and delete them using Command-Delete, then clear them from Recently Deleted by clicking “Delete All”
- Exit Photos and reopen that library and wait to make sure they’re really deleted
- Back in your original iCloud Photo Library, select all Raw Photos To Archive and delete them using Command-Delete, then clear them from Recently Deleted by clicking “Delete All”
- Exit Photos and reopen that library and wait to make sure they’re really deleted
- Watch the size of the library bundles in Finder to make sure the photos are really, really deleted from the library, then wait some more to make sure they’re really, really deleted from iCloud
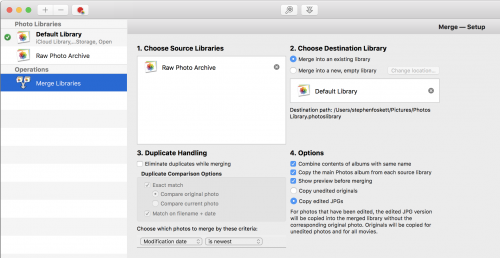
- Fire up PowerPhotos, click “Merge Libraries”, select the following:
- Drag the Raw Photo Archive library to the “Choose Source Libraries” box
- Drag the Default iCloud library to the “Choose Destination Library” box
- De-select “Eliminate duplicates while merging” since you deleted the duplicates earlier
- Select “Copy edited JPGs” so your lovely edits will be saved in your iCloud library
- PowerPhotos will restore your photos, including tags and albums, and Photos will send these back to your iCloud Photo library
This process results in a complete library of only raw+jpg images, complete with the tags you added and edits you performed, along with a complete library of jpeg images in iCloud for you to enjoy and share. It’s painful but functional. The only issue is that every time you repeat the process you get another Raw Photos archive.
I’ve asked Fat Cat to add a feature to handle this better in PowerPhotos and we’ll see what they come up with.
Stephen’s Stance
Here’s my ideal scenario for Apple Photos or Fat Cat PowerPhotos:
- Allow me to automatically select all raw+jpg files in my library
- Allow me to export and import raw+jpg files with edits and tags
- Allow me to archive unwanted raw files without losing the jpeg images in my library, perhaps allowing me to re-link the raw files in the future
I suppose I should just switch to Lightroom. But barring that, I guess I’ll have to use the process above.

Why are you shooting raw then? The point of having the raw files is so you can go back and make changes again, and if you delete them, you’ll only have the JPEGs to work on later. Might as well not shoot raw at all.
Exactly! I don’t want to delete my raws, just get them out of iCloud. The process described here allows me to move them to an archive library with all the original tagging intact, including any edits I’ve made to the photos.
But there is no way to export the raw files with edits. You can export the originals, but the only way to retain edits is to edit them in another app that allows you to save the file with edits and history.
I just open the Raw archive library with Photos, and there are the raws and my edits. Easy.
Thanks, your improved method seems to work just fine:)
Whenever I re-import the JPEG file to Photos it seems to bring the RAW file from iCloud Photo Library back down which is very frustrating. It seems like there is no way to delete RAW files from my Photo Library.
No, that is not “the whole point”. RAW files can also be used for the initial high quality editing. Once you’ve edited a photo, there is less reason to have the original RAW. If you never plan to re-edit, then there is no reason to keep the RAW file (for most people).
1: 4/18) I’ve just discovered that I’ve been importing RAW files. I figured this out because I was using iCloud for Windows. Windows is showing both the jpg and the RAW individually. Using Windows is also how I’m planning to purge iCloud of my RAW files (I’ll archive any RAW I want to keep elsewhere).
1) Wait for iCloud on Windows to fully sync.
2) Sort the files by name in Windows Explorer. Manually select all the jpg/RAW pairs I can find there.
3) Manually elect the same photos on my iPad (or Mac or whatever), I guess one by one, looking at two different screens.
4) Move all those jpg/RAW files to another folder (the download folder on iCloud for Windows is not a mirror; it is Download only, so deleting them on a Windows machine has no effect on iCloud).
5) Delete all those photos from iCloud, and empty iCloud’s trash.
6) Wait for this to propagate across all my iCloud linked devices (I don’t want duplicates reappearing from another device.) When the photos have been removed from all devices, next:
7) copy/move the jpgs only into the Upload folder on iCloud for Windows. It will begin uploading them all just as they were downloaded (I think). *note: move or copy into the Upload folder,: I don’t know which one. Once you’ve uploaded the photos to iCloud, Windows might re-download them all again regardless of if there is an identical photo already in the download folder.
8) Delete/archive the RAW files.
9) Go back to 1) and check again every once-in-a-while until Apple fixes this.
Albums will be damaged, I guess, but the only labor-intensive part of this is matching the two selections across Windows and Apple devices.
And just to state the obvious: this is crazy! I had wondered if my photos were being imported with the RAW files, but I could see no way of even finding out in iOS, and I didn’t notice the stacked J on my Mac. Apple should fix this. We need to be able to select all RAW files and treat them separately from the jpgs.
2: 4/20) Update:
1) Selecting the RAW file/jpeg combinations was easier on the Mac than I had thought.
2) Uploading from the iCloud Windows app was more troublesome, though. You do need the Windows iCloud app to separate the jpeg from the RAW file once you get RAW files into iCloud, but it is easier just to use a browser to re-upload just the jpegs.
3) It doesn’t matter, though, as iCloud seems to cache my RAW files even after I’ve deleted them and emptied the trash. When I uploaded the jpegs to iCloud via Firefox from either Windows or Linux, the RAW files reappeared on my Mac’s view of Photos. I even waited overnight and then changed the jpeg filenames … all to no avail. Do I have to wait 30 to 40 days for this to stop?! I’m guessing that if I wait 40 days, then the old RAW files will be fully purged from iCloud and I can re-upload the jpegs and no RAW files will be restored and added back again.
So, until Apple fixes this, the best thing to do is to avoid contaminating iCloud with any RAW files from the start. I shoot with RAW and jpeg on my Olympus camera, for all photos, but I use the RAW files only for panoramas, HDR stacks, (and lens tests). Then I usually delete the RAW files or archive a few of them, not on iCloud, though.
So, what I face when shooting with my Olympus em5ii now is:
1) shoot the photos.
2) Put the SD card into a different laptop and copy only the jpegs onto a second (micro-)SD card.
3) Use that second SD card to transfer the jpegs to my iPad Pro 11 via a USB-C SD card dongle.
4) Edit/purge the jpegs on my iPad.
I keep the original RAW files on the primary SD card and edit those on my desktop away from iCloud.
Having to use Windows to separate RAW files from jpegs, and having to carry a second computer to avoid contaminating iCloud when I want to use the iPad to edit in the field are both crazy. I guess iCloud and iOS are in a transition state now when it comers to RAW support, but it would have been more functional had Apple just kept two separate icons for jpeg and RAW files until they could later add in options to separate them to work with the one you want — and delete the RAW files that you don’t need.
Hi! I have a bit of a problem, 127 photos where iPhotos tells me it can’t find the original file “img…” version, it only has the “unadjustednonras_thumb…jpg” of all the images. Is there anyway to recreate or convert these to regular files so that I can upload them to iCloud with all my other photos?
Thanks for this helpful post. Regarding Smart Folders (Albums), I found that in Photos on Mac, I can select multiple photos and then run Use Raw as Original. This appears to work. However, I am finding that the Smart Folder is still not finding those images, instead only showing ones that are solely RAW, and not a JPG+RAW pair.