4K video is still in its infancy, but Mac users are clamoring for high-resolution external displays. Many Macs have the ability to drive a 4K display, but it’s not easy to get it to work with older hardware. Here’s how I connected a 4K Dell P2715Q display to may 2012 Retina MacBook Pro, one of the first 4K-capable Macs.
TL;DR: Yes, the Original rMBP Does 4K over DisplayPort and HDMI!
If you’re reading this, you likely have a 2012 Retina MacBook Pro and want to know if it supports an external 4K monitor. The short answer is, yes it does! The real answer is a little more complicated, though.
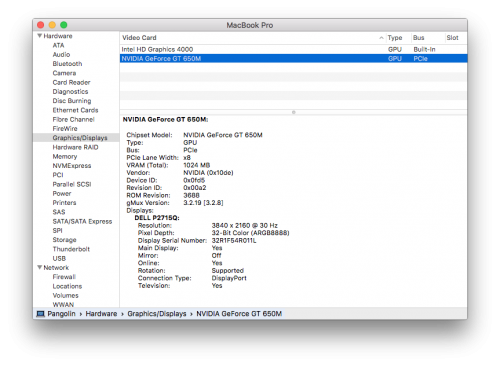
Fact: The 2012 Retina MacBook Pro’s Nvidia GeForce GT 650M with 1 GB GDDR5 memory can drive 4K resolution (3840 × 2160)1 and the HDMI and Thunderbolt Mini DisplayPort 1.2 ports can output this video signal. You can drive a 4K “Ultra HD” display with this machine.
However, it’s not that simple:
- You must have Mac OS X “Mavericks” 10.9.3 or later. Prior to this, the Thunderbolt/Mini DisplayPort connectors weren’t capable of UHD resolution, and text didn’t look great because it wasn’t scaled properly.
- The HDMI port is capable of driving a 4K monitor or TV, but only at 30 Hz refresh rate. This is usable for text but not so great for games or video.
- The two Thunderbolt/Mini DisplayPort ports can drive 4K at 30 Hz using MST, but your monitor might not auto-detect this or might require special settings (like my Dell).
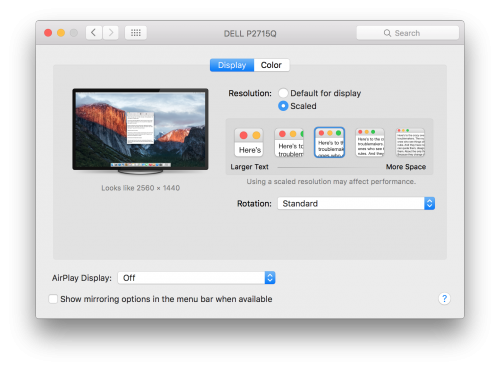
- Mac OS X will default to “Scaled” (looks like 1920×1080) when connected to a 4K display, and this is pretty jumbo-text for a 27″ desktop monitor.
So it’s not “plug and play” easy for most people. If you’re like me, you’re going to plug a DisplayPort to Mini cable into the monitor and your Mac and be disappointed when it shows up as a 2560×1440 display, complete with chunky pixels. Then you’ll try the HDMI port and see that it does work. Then you’ll use The Google, find this article, tweak your monitor and your Mac, and have something that pretty much works.
Then all of this will be moot when the Skylake MacBook Pros come out next month and you upgrade to something that can drive 4K natively over DisplayPort at 60 Hz.
Introducing the Dell P2715Q Monitor
Although Apple still doesn’t sell a standalone 4K display, Mac OS X and Apple’s new hardware are both pretty much ready for them. This is no surprise, since Apple has pioneered high-DPI displays, from the MacBook Pro to the Mac Pro and now the iMac. Pretty much the only thing missing is a 4K monitor for all these machines to drive!
Ironically, there are a ton of 4K monitors over in the PC world even though Windows still doesn’t do as smooth a job driving them usably. So Mac owners are looking at PC hardware makers like Samsung, Acer, and especially Dell to provide a monitor.
I selected the Dell P2715Q for my Mac. It’s a quality monitor with many great features and is amazingly affordable when buying through a reseller like Adorama or Amazon. Mine was a special from Adorama on eBay – just $429.99 shipped! Their normal price is a still-affordable $519. It arrived as-promised, new and in the original box. I was confident, having bought camera gear from Adorama in the past, but am glad to reassure others that they’re legit.
The P2715Q has some great features:
- Dell makes one of the best monitor stands in the business, with easy height and angle adjustment
- The screen is a non-glare matte that’s super-easy on the eyes
- The bezel isn’t crazy thin but it’s discrete enough with more matte plastic
- There’s a great assortment of ports: 2x DisplayPort, Mini DisplayPort, and HDMI for video, plus audio out and a built-in USB 3 hub
All in all, it’s an amazing monitor. And it’ll be even better once I’ve got a machine capable of driving it at 60 Hz!
Pairing a Dell P2715Q Monitor With an Older Mac
As I mentioned above, there are a few gotchas when connecting the Dell P2715Q to an older Mac like my 2012 MacBook Pro with Retina Display.
HDMI works pretty well out of the box, but you’ll want to manually set the display resolution to something better than 1920×1080 on a large panel like this. Go into System Preferences, select Display, and then Scaled. I recommend the center item, “looks like 2560 x 1440” as a nice compromise.
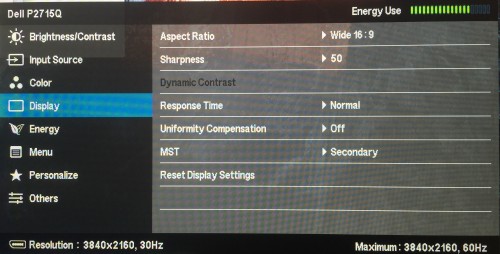
If you’d rather use DisplayPort, it is possible but requires a tweak to the monitor. The 2012 rMBP supports DisplayPort 1.2, which apparently can’t do UltraHD resolution on a Mac. But it is possible to do it using Multi-Stream Transport (MST), which combines two DisplayPort signals on one screen. The Dell P2715Q, however, has MST turned off by default.
Here’s how to enable full resolution over the Thunderbolt/Mini DisplayPort 1.2 connectors on the Retina MacBook Pro, and presumably other early Macs:
- Connect the Mac to the Dell monitor using the included DisplayPort to Mini DisplayPort cable
- Press the fourth (bottom) button on the P2715Q to bring up the Menu
- Press the third button to select the menu
- Scroll to Display, press the third button, and scroll to MST
- In the MST menu, select “Secondary”
Now the Mac and the Dell monitor will negotiate a full 3840 x 2160 signal!
Stephen’s Stance
The Dell P2715Q is easily the best value in a 4K monitor today. It has a quality panel and excellent input support, plus a built-in USB 3 hub. Although it’s not perfect when paired with an older Mac like my 2012 Retina MacBook Pro, it does work with a bit of tweaking. And I look forward to using this monitor with future Macs!
I have the exact same laptop and I was looking at the same monitor so I was thrilled to see your article. Thank you for writing it up! It’s a little unclear ultimately if you’d actually recommend the setup though 🙂 (just because you can doesn’t mean you should, ya know?).
I’m running El Capitan so the OS isn’t an issue. I’d use it mostly for work so mostly text viewing and occasional video watching. Are you able to run the laptop display and the dell at the same time or do your laptop closed? How does text look at 3840 × 2160?
So basically if you use both display thunderbolt ports and connect them to the Dell and switch it to MST you will get 4K? How’s the experience been working?
I haven’t tried using both ports. I’m using ONE port and using MST to the monitor over that ONE cable. Each cable has two streams, or so I understand…
Ok thanx for the clarification. Is this approach giving you a good experience overall?
Yes, it’s working great! I’m using it as we speak! 30Hz isn’t enough for games, but it’s plenty for “work” and web browsing. The resolution is fantastic, the monitor is big (iMac big!), and the color is perfect!
The only downsides are:
1) The fan runs a lot. I guess the GPU is working overtime!
2) I sometimes get weird window repositioning when the display/computer sleeps. Windows dropping off the screen, etc…
Great, thanx for the additional info. That’s super useful.
Just ordered my monitor as well. Thanks for the heads-up about MST setting.
You’re not going to able to read text at that res. I ordered one. So I’ll report back.
Yea, I really wish OS X would allow us to increase the size of the system text rather than force a resolution change.
I got the same monitor last week along with a new MBPr. Right now it’s connected to my 2013 MBP and works well.
So I got the monitor today. It worked with the rMBP no problem. The only thing I notice is it’s slightly laggy, which I was expecting given what I’ve been reading. When Apple updates the Pro I’ll go for one of those. Overall, I think it’s a reasonable enough experience to go for it. I’m not getting any fans blasting or anything here yet. The only problem I had was that the cable they sent along was so cheap that if you jostle it both the monitor and computer go blank for a minute. Given how thoroughly annoying it is to deal with Dell, I’m probably just going to order a new cable on Amazon and be done with it. I’m happier with the setup than I would have thought. So, thanx for posting this. I probably wouldn’t have gone for it otherwise.
I wonder if itll work with a non retina MBP 2012 model
Steve! I have connected this display with my macbook pro retina 13″, it´s late 2013 and have intel iris graphic system, do you know becouse I can´t scaled like you when I try to change the resolution, my connection is from DP to mDP, Thxs so much.
Hey, I just bought my new Samsung U28E850 4k monitor. Is it possible to use it in @4k 60Hz from my early 2013 rMBP? (On HDMI it works at 30Hz, on DP miniDP it says “Not optimum mode. Optimum mode 3840×2160 60Hz”) Thanks in advance!
I bought this monitor too. Did you find the solution?
Hi, no, I’m using it on HDMI at 30Hz. It’s a pity…
Thank’s..
I’m interesting in buying this Dell screen. I have the MBP retina 13″ late 2012 (intel 4000 graphics)… Trying to understand if this would support this Dell 4K screen at full resolution using MST (or dual Thunderbolt) feed …. Apple claims it can support 2 screens at 1440p so almost 8M pixels at 60Hz. So wondering why it cannot support 4k (also 8M pixels) at 60Hz if I use MST or dual feed. Anybody experimented with dual cable and split screen mode? (each cable driving 1920 x 2160 tile) Any help is appreciated !
I found a couple solutions. neither are exactly what you are looking for. My understanding is that 4k@60hz is not possible using hdmi (requires 2.0) or the display port (video card limit?).
Also, I had the same error. You need to force the mac to output 60hz.. the samsung seems to choke on 30hz. Display Menu application can fix the first issue.
Best you can do is to install Display Menu (or Display Menu Pro) from the mac store and set it to 2560×1440 @ 60HZ. I am currently working with two 2560×1440 monitors simultaneously @ 60HZ (one asus native and the other the samsung running at this lower resolution and looks good but not excellent) I am waiting for the next macbook pro which will probably make this all a moot point.
However, in playing around trying to get different things to work, I stumbled across a possible solution. If you are not looking to run multiple monitors (I am) and you are not looking to do full screen gaming (which the 2013 early MBP wouldn’t be able to drive at 4k anyways) then there is a way to run 3840×2160 @ 60hz on a single external monitor
Use an hdmi cable and a display port(TB) cable into the samsung monitor. I used HDMI1 and the DP inputs.
Turn on the Side By Side (PBP) mode on the monitor. This will put two native 1980×2160 monitors right next to each other. The early 2013 can drive two of these monitors at 60hz
You have to set up the two displays in the arrangement tab correctly
also you have to turn off the “Displays have Separate Space” deal in the System Preferences -> Mission Control
After that is set up I had to mess with the contrast of each individual display, as apparently the HDMI vs DP screen outputs were slightly different. Additionally, your menu bar at the top only goes across half the screen. Full screen apps (like blizzard) will default to half the screen (picture by picture)
But websurfing and documents and quicken etcetera all looked great! Not sure if this is common knowledge, useless knowledge, or if I am the hacker of the century, but thought I would share.
I have a non retina MBP 2012 model – and I’m having trouble. My HDMI cable doesn’t support 4k (1080), – might have to get a new one. When I use the DP out to the box, it only display one half of the monitor. It’s very frustrating. Can anyone help?
I’m having a problem where when I connect the P2715Q to my 2012 MacBook Pro – it only shows up half the screen. Does anyone else have this issue? When I connect to the 24″ model they had in store – it worked fine. But I’m having issues with the 27″ model. HDMI works – but only at 1080p. This is the second monitor I bought – so it’s probably not just defective. Please help.
https://uploads.disquscdn.com/images/ecf2b2f55bb2ff4a1fb4094ceb38121afca46e237c27e1cc5d69eb1303f4b2d6.jpg
im also having this problem my DP did not work after updating my os! any help?
i have 2015 MBP and dell u3214q, my question is can i use thunderbolt to thunderbolt cable for 4k 60hz? my MBP cant detect my monitor after the OS update! please help me.
Stephen, if the single HDMI cable as well as the dual miniDP cables can run the monitor at 30Hz, is there any reason to choose the dual miniDP cables vs. the single HDMI cable (or vice versa)?
Is that possible to run Dell P2715Q on rMBP 15″ 2013 late (with external GPU) with full resolution and 60hz? Thanks.
Ok. I figured it out – the answer is YES. 🙂
Hi,
I have a macbook pro retina mid 2012 and want to buy the p2715q. You are getting retina (HiDPI) in the external display?
What resolution appears available for you using scale?
Best Regards,
Fábio Sbano
Interesting discussion thread. I have a late-2015 rMBP and acquired a Dell P2715Q (3840×2160@60Hz) to have a high-res display and wanted to also use a Dell U2715H (2560×1440@60Hz) as a secondary display. I thought I should be able to use the DP MST options to add the second display, but have not been able to make that work as this discussion thread seems to suggest. What does seem to be working well is running the P2715Q off a thunderbolt port into either the DP or mDP monitor input, while running the U2715H from the HDMI port into one of the HDMI inputs. This setup allows full resolution on both screens at 60Hz.
Macbook Pro mid 2015 – 4k 60hz
Hello!
I have a Macbook Pro mid 2015 and I want to use a 40″ iiyama monitor at 4k 60hz. The monitor itself supports 120hz.
The problem is that I cannot do that. I only have 30hz on my monitor. I have Sierra 10.12.1 and it is connected via mini displayport.
Please help me with this problem. It is frustrating…
Hey Can you let me know how you successfully connected a late 2013 rMBp to 60hz/4h display ? Thankssss
Hi,
This is what I did by using Mac Mini (Mac Mini is running it with no-problem in some way).
Main issue is: You need to turn on and turns off MST mode on your Dell. When you plug it to mbp the MST mode is locked.
So what I did:
1. Plug your Dell to mac mini by HDMI
2. Go to setting in dell display and turn on MST.
3. Now plug dell to your mbp and it’s still 30hz.
4. Plug Dell one more time to mac mini and turn off the MST mode.
5. Plug Dell to your mbp via DP and that’s it. Now you’re running 60hz/4k.
Probably you need only to turn on and off mst and you dont have to do this 3rd point but I have it in my notes.
Hope it’s helpful for you.
wow, glad you figured that out and thanks for fast response ! just for info for future readers, I am thinking about either the P2715Q, or the LG 27UD88-W , which has a USB-C connection for charging new macbooks, good if I buy a new MBP in the future…
Hi Fabio
Is that your post: http://apple.stackexchange.com/a/250708? Am I got you right that you’ve managed to run 4k@60hz on non-retina MacBook? How did you do that?
Thanks
Max
Just bought an ASUS PB287Q with 3840×2160, just hooked it up with no problem and it worked out of the box. Didn’t need any special settings on the monitor. I’m on a mid 2012 retina MBP
Hi Steve,
I have late 2012 MBP Retina and the Dell montor, I can run HDMI, but somehow the Dell does not recognize the signal when I plug in the mDP to DP cable, although having been set on MST secondary.
Any ideas what could be the issue? I run Sierra (10.12.3)
I have the same issue, although sometimes it works. The only thing that make me mad, is that it’s a software issue not a hardware issue. I know this because if you use Windows 10 through Bootcamp, everything works like a charm.
The only way I’ve been able to get it to work is by using [SwitchResX](http://www.madrau.com/) and using the 2560 X 1440 (60 Hz) option
This article is exactly what I was looking for. Thank you!
I have a couple of questions on my setup with my Retina Macbook mid-2012 with GeForce GT 650M, and I was wondering if you knew the answers:
1. I’m considering using two monitors: a 4k monitor (LG 24UD58-B) at 3840×2160 at 30Hz, like you describe, and another 1920x1080p monitor connected to a different port. I could connect both to DisplayPorts, or I could connect one to DIsplayPort and the other to HDMI. Do you know if I would lose 3840×2160 on the 4k monitor if I did so, or would I be able to run both?!
2. The LG 4k monitor I described above, says it supports FreeSync technology, but only on DisplayPort. (This may save me from lag due to 30Hz.) A bit of googling told me that DisplayPort 1.2a is the version I’d need for this to work (HDMI won’t work because my GPU is nVidia and not AMD.) My question is, is DisplayPort 1.2a a SOFTWARE upgrade on the MacBook, or a hardware thing that my machine doesn’t support? (I have El Capitan 10.11.6 at this point.)
Thanks once again!
By the way, my mid 2012 rMBP 15 with Nvidia 650, to my surprise, is running 4k @ 60 Hz in my Viewsonic VP2780. The 60Hz freq. is not achievable with Display Port.
I discovered that just this morning ! Very happy.
Wrote this on May 22, 2017.
How did you connect with your monitor? using HDMI cable 1.4 or using HDMI 2.0 or you need any connector to get 60Hz? please please reply buddy. I have mac mini 2014 but only support 30Hz 4k and also have 2012 Retina 15″ MacBook pro with Nvidia 650. if my MacBook pro support 4k @ 60Hz than I get rid of mac mini 2014. please please please reply how you get 60Hz 4k with MacBook pro 2012 Retina. million thanks bro..
Wanna know +1 Still use rMBP 2012 15” with Samsung U24E590 @ 4K with 30Hz
I have the same problem. Did you resolve your problem with this monitor?
I bought the smaller one in 24″ inches and is working really well!
I have a mackbook pro 15″ 2011 model & bought the Dell P2715Q and i can only work in 1920×1080… MSP is set to secondary as mentioned abve and I am using the DisplayPort to Mini DisplayPort cable, still only at 1920×1080 and 30 hz, when i use a thunderbolt cable the screen won’t even light up. Any insight would be greatly apreciated, thanks in advance….
Hi,
I have a Macbook Pro mid 2014 retina and I cannot get the refresh rate to be above 30hz. Anybody know any tricks to get it up to 60hz?
Many thanks,
-Matt
Also interested in what Sunil asked and also what model of the ViewSonic VP2780 do you have: the 4K UHD or the WQHD?
Hi Sunil,
I use a Insignia HDMI cable, bought this year. Before I have been using a Radioshack HDMI cable (covered with cloth). I cannot tell you if the cables are 1.4 or 2.0. Both of them perform as mentioned. I changed to the Insignia because it is thinner and reduces cable mess. Right now I´m writing this response in Windows 10.
René
Hi Ruben,
What I know about my monitor is that the “default” resolution is 3840 x 2160 and W10 runs at that res @ 60 hz . Hope this is useful to you.
Regards,
René
Thanks René, that’s very useful. Still looking at my options for a new external display, so knowing that the ViewSonic supports that res at 60Hz is definitely a big plus.
11/2/17. Well, I too will jump into this as a novice, if anyone is out there to provide any insight. I have a MBP mid-2012 retina display running Sierra 10.12.6. At this point, can my MBP drive the Dell P2715Q for photo editing work? Will it not play video very well? Not sure I can upgrade to this 4K monitor. Thank you.
I purchased the Dell P2715Q monitor based on this column. Dell customer service was “aware” of the article, but would not confirm. I hooked the monitor up yesterday to my MBP (Late 2012) and followed the instructions as outlined. Bingo! Sure enough, it could be scaled to 3840×2160. The picture quality is incredible…but my eyesight isn’t that good anymore to be able to read the menu type. I have also downloaded SwitchResX and put it to the 2560×1440 (60Hz) but the resolution is quite poor. If I’m “stuck” with the picture quality at 3840×2160 I can live with it. I use it as a second monitor for editing. But I sure would like to resolve the issue. I know this post as been up for quite some time, so I’m curious to see if any progress has been made. Thanks!
I use the ‘looks like 1920×1080’ scaled setting – if my apps are hi-dpi aware, then they run at native 3840×2160. If not, they get 2:1 scaled.
A thunderbolt monitor works too, not display port
If the monitor has thunderbolt, it will work perfectly. This way it’s will be thunderbolt to thunderbolt.
Hi Walter,
I have that same Mac as you with a discrete Nvidia chip. I have not been able to work @ 60 hz with High Sierra out of the box. Nevertheless, using SwitchRes X4 I could find a combination that worked with Mac OS @ 60 HZ BUT BUT I could never achieve the same ratio of Vertical and Horizontal pixels as with said OS (alt 60 HZ) when scaling.
Dear Rene, Thank you so much for your very welcome reply. Do you know if there is a software or hardware upgrade for the mid-2012 MBP that would definitely solve the monitor operation difficulty? Or would I need to get a newer-model MBP? Your reply is greatly appreciated.
Dear Walter,
From my experience there is no hardware “solution” as per your interest. What I can tell you, Walter, I have used my rMBP 2012 with no trouble with my monitor, a Viewsonic VP2780 ( BUT @ 30 hz) with no problem at its higher resolution. Very good for managing photos (i.e. static images.)
Rene, At 30 hz how well does your monitor display YouTube and other such video? I am not a gamer, so that is of no concern to me. And what maximum screen resolution works best for you? Thank you.
Walter,
It displays very well if you use static images / browse. Games went well until I realized that I was playing @ 30 Hz!! Then I saw some “blinking”, but probably with a lot if psychological influence,
…but I usually don’t play games.
Its fine for retouching images and movies.
Regards!
Hi!
About to buy a 32″ 4k monitor for use with a mid 2012 15″ retina Mac Book pro. Do I get the following right?
According to the article it is easily feasible to connect the Dell Dell P2715Q to the laptop using the dispaly port and getting 4k@30Hz. You have to enable MST at the Dell. Other monitors don’t have any MST-setting in their preferences. However, they have dedicated DP 1.1. and 1.2 inputs or you may specify 1.1/1.2 in their menue.
As according to wikipedia DP 1.2 introduced MST, is switching to DP1.2/using the dedicated DP 1.2 input similar to switiching MST on at the Dell? That means any monitor who supports DP 1.2 should work at 4k@30Hz driven by the MBP?
Apples claimS that only rMBP from late 2013 on support 4k – it works anyhow?
4k@60Hz works only with tweaks or hassle (treating the monitor as two split monitors driven eg by 2 DP or by DP and HDMI?
Kind regards
Hi! Do I get this right:
With a mid 2012 rMBP, mandatory condition for 4k@30Hz is to enable MST like in the article (or, as many monitors don’t have a MST-setting in their preferences, just use the monitors DP1.2 input as this is synonymous with MST)?
Therefore, any 4k monitor with DP 1.2 should work? I am about to buy a 32″ 4k-monitor and the non-Dells are markedly cheaper, eg AOC U3277PWQU
Kind regards
Ruben…Check SwitchRes by Stephàne Mmadrau. Works beautiful at pairing my 2012 rMBP with my Viewsonic 2780!
My newly-purchased 28″ Philips 4K Brilliance 288P with mid-2012 15″ MacBook Pro Retina via HDMI port seems to be causing periodic system crashes on High Sierra 10.13.3 (two or three over 3 days). There are occasional black screens (a few per day) on external monitor which last a few seconds and screen lag time is noticeable (due to being only 30Hz, I presume). Graphics switching is disabled. Res is “looks like 2560×1440” on external monitor, “looks like 1920×1200” on laptop screen.
https://apple.stackexchange.com/questions/310970/what-software-caused-my-macbook-to-panic-reboot
I am plugging and unplugging the external monitor fairly often, this may be contributing.
Like others, I’m waiting for the new MacBook Pro to be announced so I can run the monitor at 60Hz, but if Apple’s removal of features and “form-over-function” design trend continues, I’m moving away from Mac after owning three MBPs.
Hi would we be able to drive a full 4k monitor over MST on a retina 2012 macbook pro? Or how would that work?
My guess is you’re running Windows on the rMBP? There has been much griping about the fact that the mid 2012 rMBP running Mac OS X maxes out at 30Hz with 4K, but boot up Windows on the same laptop and it’ll do 60Hz.
Right Rainier! It also looks beautiful. Nevertheless with the aid of the app SwitchResX by Mr. Madrau, you can achieve 60 hz refresh with Mac OS X a different resolutions in a 4k monitor, but somehow it does not look as pristine as Windows.
recently purchased the Dell P2715Q, this works as advertised above with both types of cables.
I’m running the monitor on a mid 2012 retina MBP. my only gripe is that it is pretty taxing on the ram and CPU. definitely a performance hit. The monitor is crisp and well worth the 333.00 I paid on amazon for it. I needed something that had crisp text and rich images as I work in graphics.
That is probably because the Nvidia GPU driver for “Windows” outputs 4K@60Hz from HDMI 1.4 to YUV 4:2:0.
Compared to RGB color information is lacking, but the bandwidth required for that is less than 10 Gb/s, so it is technically possible.
Of course, it is necessary for the HDMI input of the TV to be compatible with HDMI 2.0, and HDMI cable is 1.4 compatible and there is no problem.
And the most sad thing “macOS” can not output with YUV 4:2:0 …
Thank you writing this. I just bought the P2715Q and hoped to use my Mac Book Pro Mid 2012. I’m currently running High Sierra 10.13.4. The issue that I’ve been having is that there’s a lag between my external keyboard and mouse. I can type a few keys or move the mouse and its a few ms behind. Also there is a little lag as well when I scroll up and down web pages.
I was reading on another site that buying a “compliant” cable might fix the issue since the one that comes with the Dell monitor is cheap. I got an Amazon Basics one which actually helped but still not smooth. Is this the best its going to get? I’ve just be on HDMI as of now which isn’t as sharp.
Thanks in Advance.
Use DisplayPort cable. HDMI supports only 30hz
Hi. First of all, thanks for all the information. I still can’t make the whole connection of my work station. I’ve always worked with a TV with HDMI, which served me as a second screen. I’ve got a Dell P2715Q and wanted to use both of them, connected to my MBP Retina 13” late 2012 with High Sierra. The idea is to edit pictures in the Dell screen and organize them in the TV. I really have no idea how to connect all of them, the display port that I plug to the Dell doesn’t work when I connect the HDMI to the TV. Can someone help me somehow, I’d deeply appreciate it.
I used a mini-display to display port adapter and I got 60 hz on my mid 2012 non-retina macbook pro.
according to Apple mid 2012 will not support 4k monitor:
https://support.apple.com/en-il/HT206587.
i didn’t see it before and i bought the LG 4K 27UD88-W to connect to my MacBook Pro 15 Retina mid 2012. the best resolution i can get is 1920×1080. 3840×2160 appears as (low resolution). any idea if there is a way/software/hardware to stream 4k?
Thanks.
Hey there Sean, is your MBP the one with Intel Graphics, or Nvidia?
I tried my Intel graphics late 2012 retina MPB on a few 4k monitors, but haven’t had any luck :(. Not the Dell P2715Q yet, but I still have hope 🙂
Hey there Bill, is your MBP the one with Intel Graphics, or Nvidia?
I tried my Intel graphics late 2012 retina MPB on a few 4k monitors, but haven’t had any luck :(. Not the Dell P2715Q yet, but I still have hope 🙂
NVIDIA GeForce GT 650M 1024 MB graphics
Hey Sean!
I am looking at working a 4k screen as descripted above. Macbook same specs as you. Since you responded lately: How’s the performance of the macbook (sound, dynamics) with the 4k screen at scaled resolution?
Wow! I can’t believe I found this article that was so specific to my question (4K with a mid 2012 Retina MBP). I want to drive a Cintiq Pro 24 over HDMI so hopefully 30hz will be good enough for screen drawing.
I have mbr 15 mid 2012 and Samsung 4KUR550 I can’t use minidisplay port the monitor doesn’t recognize, only works with HDMI 30hz It,s possible use mini display port to HDMI ?
This guide is quite awful since it doesn’t tell that you are using a 15″ Retina Macbook Pro 2012 . Some people would believe a 13″ Retina Macbook Pro 2012 would work but it has only Intel HD Graphics 4000 and only supports up to 2560 x 1600
Ive got macbook pro 13″ and it supports up to 30 HZ, while using macOS Mojave 10.14 I can’t change the refresh rate. Is there any way around it ?