I’m a big fan of “sparse bundle” disk images in Mac OS X. They allow me to create encrypted repositories for valuable data that can efficiently be rsync-ed between disks and don’t waste a lot of space. So I thought I’d write up a bit on what they are and how they can be used.
What’s a Disk Image?
I suppose I should start with a bit of background info on why I love sparse bundles so much. Here’s the low-down!
We’re all used to dealing with hard disk drives and thumb drives: They offer raw “block” storage that is formatted with a file system and used by the operating system, applications, and us users. Buy a 4 TB hard disk drive and you can format it and store (about) 4 TB of stuff on it.
Disk images are a little less familiar to average folks, but they work pretty much the same way. A disk image is a file on a disk that acts like a separate disk. It could be a virtual hard drive for a virtual machine, a copy of a DVD or Blu-Ray disc, or an archive for an application that wants to use an entire disk.
My favorite use of disk images is as a secure, encrypted drive for important data. Create a disk image with encryption and you can move it around from drive to drive or machine to machine without having to worry that someone else will get their hands on the content. Sure, you could encrypt your whole drive but this isn’t always desirable for removable media (portable hard disk drives and thumb drives) since you often want to have some “wide open” space, too.
When you create a disk image, you must specify the size of the virtual disk drive, and this space is typically consumed immediately regardless of how much data you actually write to it. So a 1 TB disk image will take up 1 TB of actual capacity on whatever drive you write it to. And the entire image is treated as a single huge file, so it’s not efficient to update a copy of it after you’ve changed something.
What’s a Sparse Bundle?
Happily, Mac OS X supports a “sparse bundle” disk image that solves these issues. Sparse bundles are thin provisioned, meaning they grow as you add data. And they consist of many (many!) “bands” of data, each stored in a separate file. So it’s very efficient to keep sparse bundles images in sync between media using a command like rsync.
Create a 1 TB sparse bundle disk image and it will take up only a few megabytes of physical space until you add some data to it. Then it will grow as you write to it, creating new few-MB files one after another to handle your data. The size of the bands is determined by the size of the total image, and might be 1, 2, 4, or 8 MB.
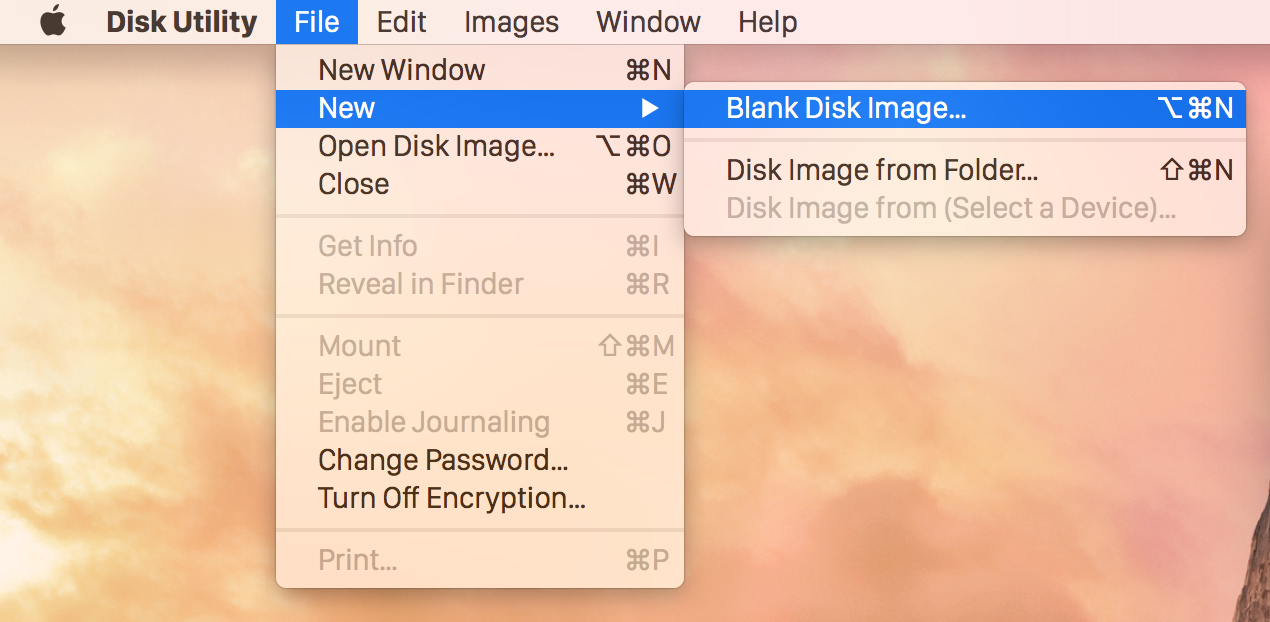
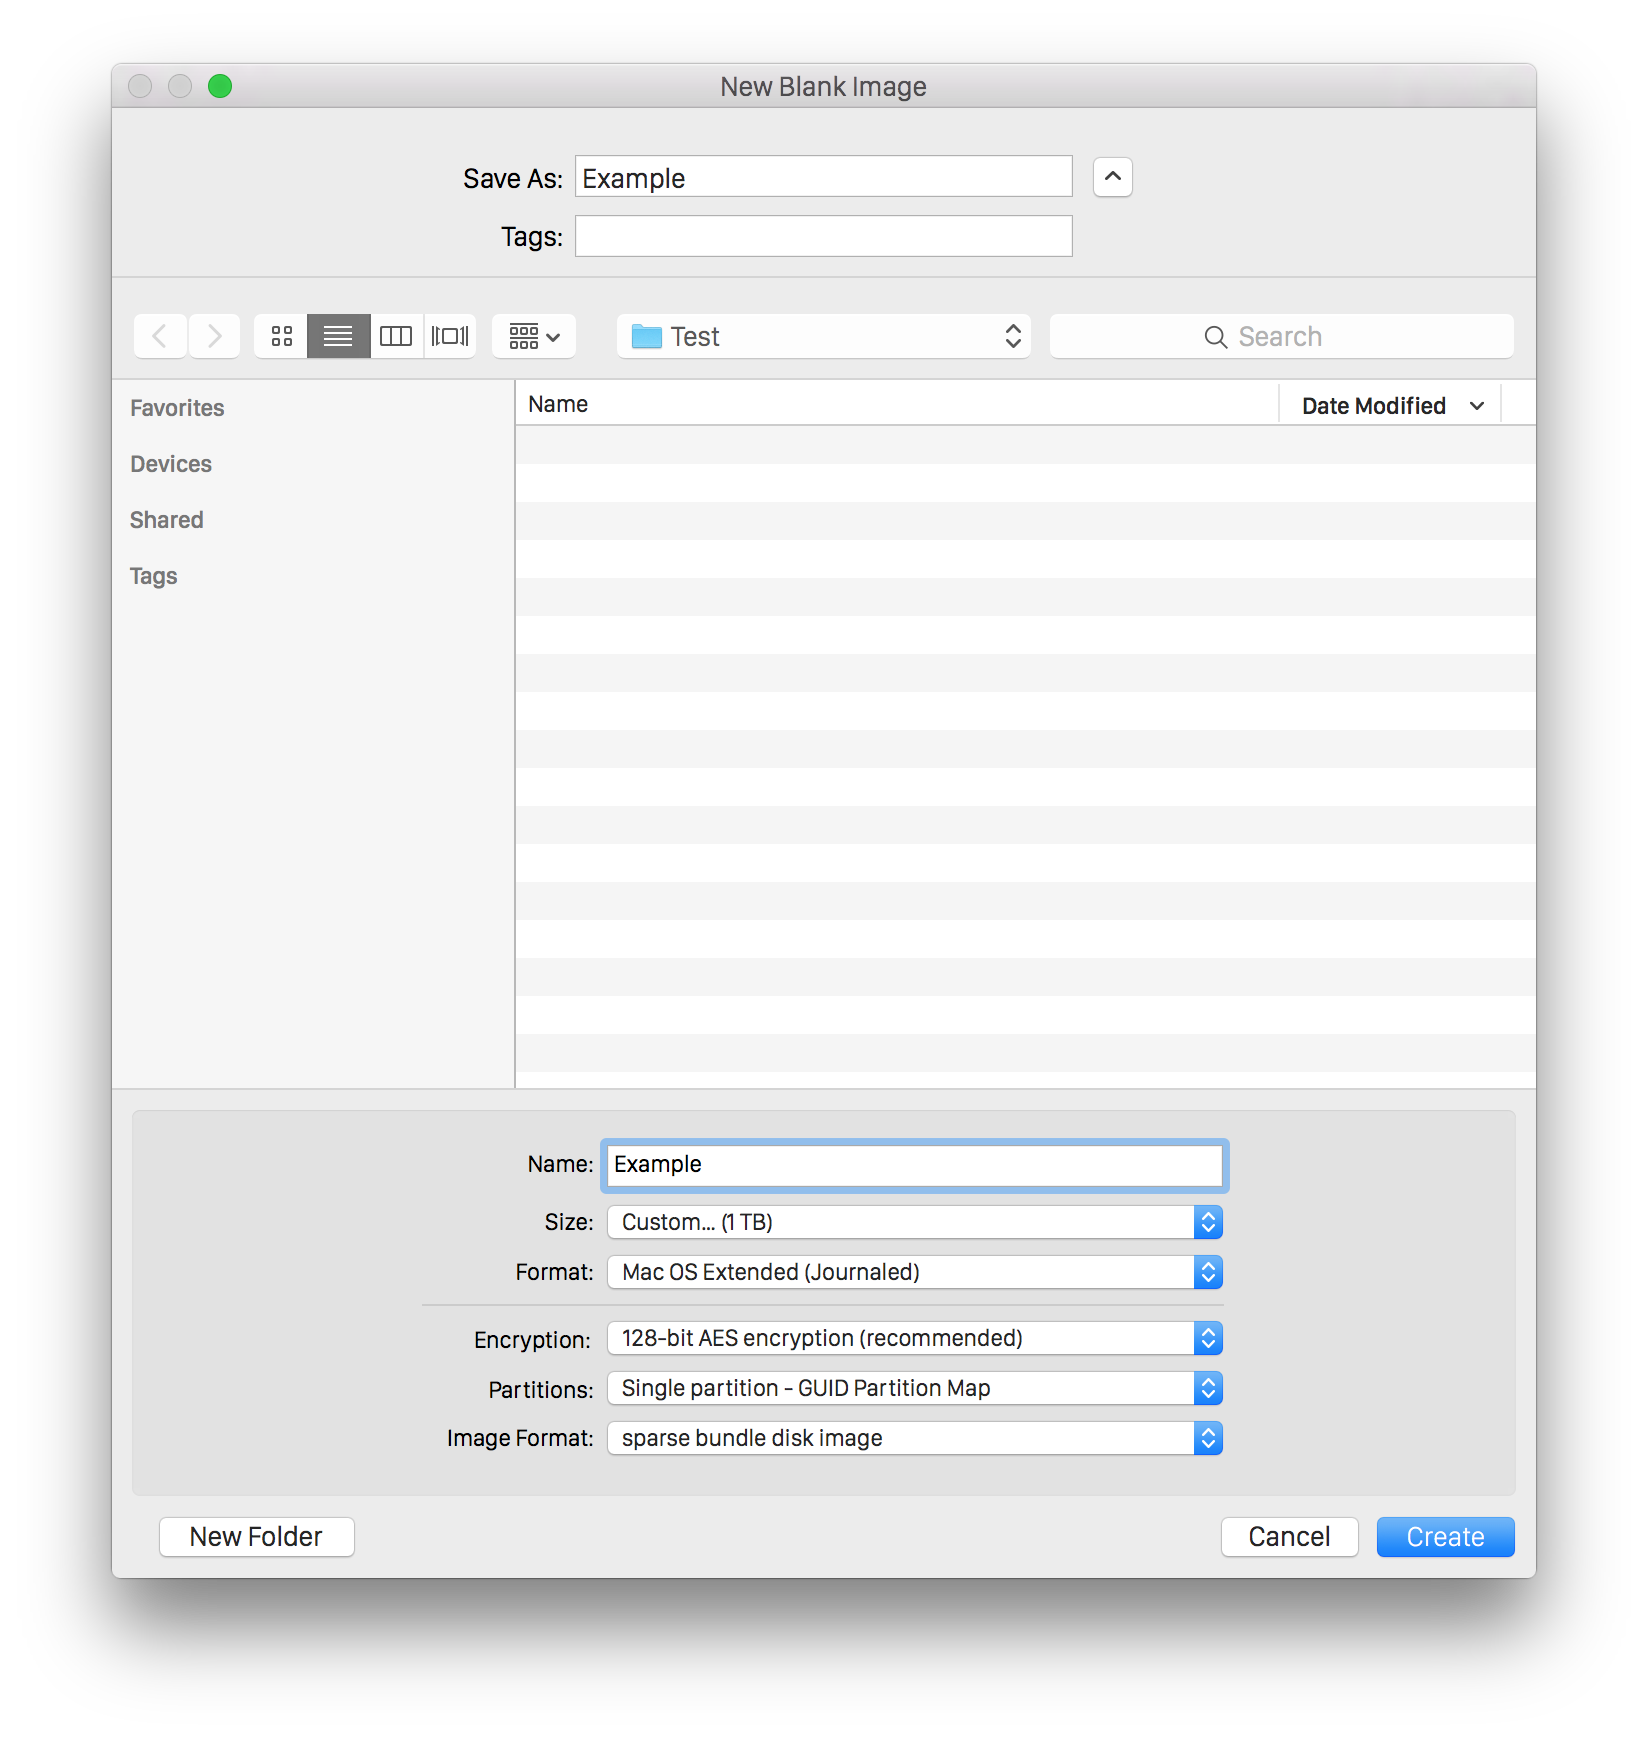
You can create a sparse bundle using Disk Utility in Mac OS X, as shown below.
If you’re curious about the sparse bundle format, you can examine it from the command line. It consists of a “bundle” in Mac OS X parlance, which is a directory which is treated as a single file by Finder. 1 Inside this directory, you’ll find a few reference files as well as a subdirectory called “bands” with the files of actual data. As you add data to the sparse bundle, it will create more bands to store it.
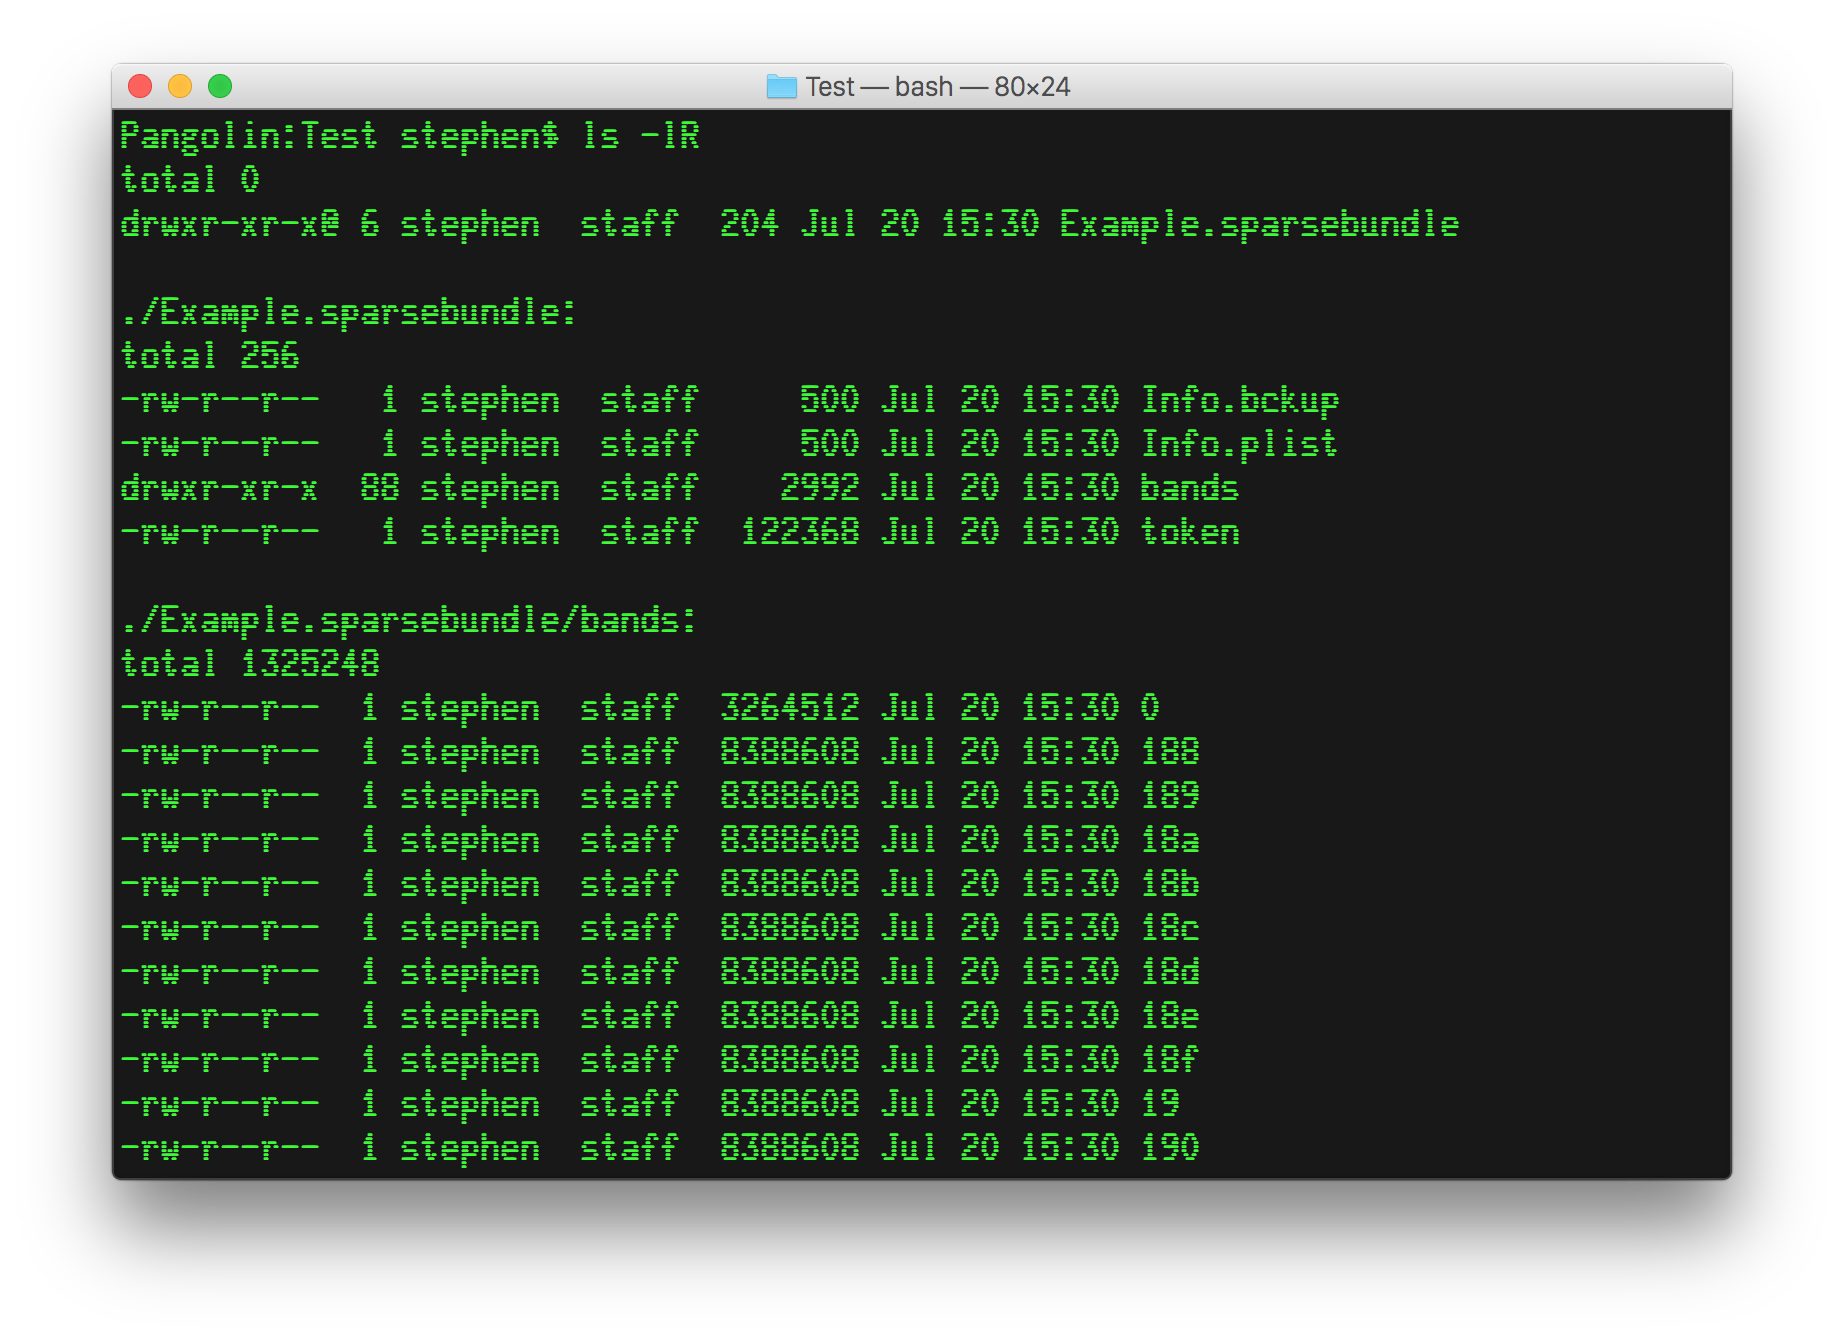
You can also examine a sparse bundle by right-clicking in Finder and selecting “Show Package Contents”. But in everyday use you will see the bundle as single large file. Double-click on it in Finder and it will mount as a new drive that you can use just like any other.
Efficiently Moving Sparse Bundle Disk Images
Let’s say you wanted to create a sparse bundle on a thumb drive to hold some important data. I recommend formatting smaller flash drives using the exFAT filesystem so they can be read on both Windows and Mac OS X machines. exFAT is better than FAT32 and Mac OS X is happy to write a sparse bundle there, but it’ll work on FAT32 or regular HFS+ too.
The quickest way to move data in Mac OS X is usually dragging-and-dropping in Finder. 2 And since Finder treats a sparse bundle as a single file, you can easily drag and drop your newly-created bundle to another drive.
But things get more complicated once you’ve started using the drive. As you add files, you have to be careful to keep both the original and copy in perfect sync or you will corrupt the bundle and lose the data. That’s bad.
I like to use rsync to keep bundles in sync across drives or machines. It’s purpose-built to do this, included in Mac OS X by default, and works wonderfully with sparse bundle bands!
For example, let’s say “Theon.sparsebundle” was an encrypted sparse bundle on a thumb drive called “Winterfell” and you wanted to keep it in sync with another drive called “Pike”. Here’s the rsync command you would use:
rsync -hav --progress --delete /Volumes/Winterfell/Theon.sparsebundle /Volumes/Pike
Enter that on the command line in Terminal and rsync will examine each file and synchronize everything that changed. The “–delete” part is important since it will remove anything on Pike that’s not also on Winterfell: A disk image must have only one master; as soon as it is split it will become corrupted! 3
Let me reiterate that last point very clearly: Decide which image you will treat as the master and always only write to that one! Do not try to modify the same image in multiple locations or you will lose track of which is which and you will lose data! In this example, you could use the Theon image on Winterfell for regular reading and writing and keep the copy on Pike as a backup in case you lose Winterfell, but don’t try using Theon on Pike, too, or he’ll get very confused! 4
I like to create a simple shell script to store my rsync operation so it’s executed the same way every time. Just write the rsync command to a file ending in “.sh” and “chmod +x” the file to make it executable.
Taking Out the Trash: Compress Your Sparse Bundle
One aspect of sparse bundles that is not handled well is trash collection. Just like a normal Mac disk drive, deleted files will be stored in the “trash can” rather than deleted for good. But when you empty the trash, the sparse bundle won’t get any smaller!
Although sparse bundles are thin provisioned, they don’t have any built-in un-provisioning mechanism. Once a band is created, it continues to exist. It can be re-used by new data, but your “sparse” bundle will eventually grow to the total size you created at the start, and this can be problematic.
Thankfully, there is a command line function to “compact” a sparse bundle! The Mac OS X command “hdiutil” can do lots of great stuff with disk images, including mounting, un-mounting, and compacting them. It can even create them if you’re so inclined.
First, delete what you don’t want anymore and empty the trash. This tells the file system on the sparse bundle what is and is not being used.
Next, un-mount the sparse bundle but don’t pull out the drive:
hdiutil eject /Volumes/Theon
Now you’re ready to reclaim space and remove any un-used bands:
hdiutil compact /Volumes/Winterfell/Theon.sparsebundle
And we’re good! The hdiutil command will remove any un-needed bands and return the sparse bundle to the minimum size possible. Then you can re-mount it and use it as normal. Just compact it again once you’ve deleted a bunch of data and feel it’s gotten too big.
Stephen’s Stance
If you’re careful about keeping them in sync, sparse bundle disk images can be a wonderfully useful tool in Mac OS X. You can have a secure repository for sensitive data on thumb drives or even in the cloud! But make sure to treat only one as the “master” and use rsync carefully to avoid losing data.
- Bundles are also used by Photos, Final Cut Pro, and other Mac applications. ↩
- I’ve timed command line cp, tar, and rsync and Finder is typically quicker. ↩
- See what I did there, George R. R. Martin? ↩
- Yeah, I did it again… ↩

Hi Stephen, i want to first of all thank you for this great blog. I have learned a lot really but as i am not sure about everything i prefer asking you one question before i do something that i will for sur regret. So here it is, since a few years i have saved many of my different Mac (Mini, MBP) and i have found many (.sparsebundle) on many external hard drive.. When i try to open them, i have different answers: 1. .in Progress (But i don’t have anymore this machine!!) and 2. no system found (as shown on picture). So my question is: I have did to many backup’s the wrong way and now i’m in no way to find a way to get them back or not?
In advance i thank you and will wait for your answer (if there is one of course.. 😉 )
Thanks for the great article. I’ve been meaning to do this, but I wasn’t sure if it was safe to do so, that is keeping a one-way synced sparse bundle disk image in USB thumb drive or anywhere else. I wanted to also sync the disk image in the cloud (preferably in Dropbox or OneDrive), effectively giving me a backup in the cloud. Also, using the Dropbox allows me to skip the ‘rsync’. Anyway, I’ll give it a go, and see how it works.
Hi Stephen,
i bought an airPort time capsule and it seems to be hooked up right but the “Data” appears to be saved in a sparse bundle. i am doing this so that I can clean off my computer and upgrade my mac so i’m afraid to do anything b/c i don’t know how to access the data to be sure my pictures are there. Are they?
I, too, would like to know how to access this data on my time capsule.
Hello, I know this article is a couple of years old but I’ve just rediscovered a sparse bundle I was convinced to make years ago now and which I have been unable to access since. The password I set doesn’t open it and I’ve tried every iteration of it that I can imagine. I’m not tech-savvy at all but can you tell me, is there any way of retrieving the contents without the password?
This is super interesting, thanks for the guide Stephen.
I’ve got the following use case:
I have one mac, one NAS at both my home and my office. I work with media files (Lightroom, Final Cut Pro) in both locations, and occasionally offload files like completed projects to the NAS. I use a Bittorent based platform (Resilio sync) to keep the Macs in sync. I currently only offload to the NAS at home and back that one up to the NAS in the office.
In an ideal world, I would be able to connect to any of the NASes and have my MacOS mount the NAS shares in such a manner that my apps (Lightroom, FCP) couldn’t tell the difference.
This way, I could work against either of the NASes, and have the changes rsynced to the other NAS at night-time for example.
Sparsebundles initially seemed like a great solution here, except that you say only one can be “master” – i.e. written to. So I cannot write to my home NAS, let it rsync to the office NAS during night time, and continue working against the NAS in the office in the morning for then to have the changes sync back to the home NAS.
Now, if I’m not mistaken, if I just use standard SMB shares, and Rsync the data back and forth this shouldn’t be a problem.
Sorry for the long post, but I guess my question is: is the main reason for your use of Sparsebundles the ability to encrypt them?
Because it seems to me, that just writing to a standard filesystem would provide the same benefits of backups (rsync-ability) without the need to “mount” a bundle, and maintain a “master”.
Thanks in advance
Very helpful, thank you. One note to others who are new to mac from linux, is that when working in the bundle from the Terminal, even though you can cd into an image like ~/Document/myBundle.sparsebundle, and even create files, it took me a while to figure out that I should’ve been cd’ing into the mount point, which would be /Volumes/myBundle. I couldn’t figure out why Finder and the Terminal were out of sync (files created in the Finder wouldn’t appear in the terminal, and vice-versa). It’s odd to me that one could edit the file on the filesystem and the mountpoint separately without getting some type of error, but I’m admitting my ignorance on the matter.
Once again, thanks a lot! Since in the repository I was cloning the case differences are meaningful, I was having trouble figuring out a way to get around this issue!
Thanks – this really helped and was easy to follow
This is a horrible idea! When you upgrade to the next version of OSX that space was created with, you will soon find out why. 🙁
Hi Stephen,
what about HARD LINKS when copying a timemachine sparse bundle to a different volume?
For preserving hard links the -H(capital) option is necessary according to the man-page of rsync.
In your command it seems that hard links are not preserved?!
>> rsync -hav –progress –delete /Volumes/Winterfell/Theon.sparsebundle /Volumes/Pike
Should the -H option be added to that command line when copying timemamchine sparsebundles to keep them functionally?
Joerg
Your rsync command at https://blog.fosketts.net/2015/07/22/how-to-use-mac-os-x-sparse-bundle-disk-images/#fnref-9106-2 is cut off at the end. It seems like the OCuLink image on the right is overlapping the very end of the rsync command. I see “rsync -hav –progress –delete /Volumes/Winterfell/Theon.sparsebundle /Volumes/Pi”. There is a tiny part of the missing “ke” that still shows. If I select the line and copy it to the clipboard, I do get the full command. I get the same thing using the Chrome, Firefox, or Safari browsers.
I’d say yes, add the “-H” option to rsync to preserve hard links.
You would have to “mount” your TimeMachine sparse bundle. Easiest would be to use TimeMachine preferences to select the drive and start a backup to it. You can stop the backup right after it starts (or not) and turn automatic backups off in TimeMachine Preferences (or not). You should then be able to find your drive mounted somewhere in /Volumes . If you’re using the finder to navigate around, you may have to use Finder’s “Go to Folder…” from the “Go” menu to get to /Volumes .
I am trying to clone a sparse disk over to a new micro drive–but as regular folders that are contained on sparse disk–to facilitate better Time Machine backup. However, when I open a just-transferred InDesign file, for example, it still shows all the linked elements on the old sparse drive. Is there a trick to bringing it all over and updating locations?
Hey thanks for writing this article. Very helpful!