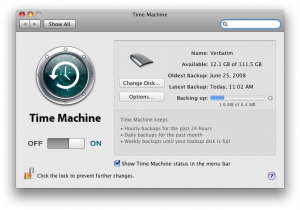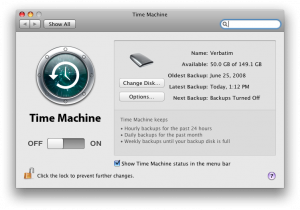
Well, that happened pretty quickly! After upgrading the internal hard drive on my MacBook Pro to 320 GB, I moved the 120 GB disk Apple shipped with the machine to my Verbatim SmartDisk FireWire+USB enclosure to use as a Time Machine backup target. Despite applying some tricks to reduce the amount of data backed up by Time Machine, I filled up the 120 GB drive pretty quickly indeed! So I decided to swap the 160 GB drive from my Maxtor OneTouch 4 Mini USB drive into the (faster) Verbatim FireWire enclosure to give Time Machine some (temporary) breathing room.
It turns out that you can move Time Machine backups easily, with included OS X tools, and without breaking anything. My old backups are still visible, and I have another 40 GB to work with. Read on for the details!
The Windup
In order to effectively use Time Machine, you really need a backup target disk larger than the one you’re backing up. But I didn’t have that. I was able to prune out 28 GB of data in my home directory that didn’t need to be backed up, along with 22 GB of operating system data, by tuning Time Machine. Although my lappie has over 300 GB of storage space, Time Machine only has to back up 66 GB of it – Windows Vista has 55 GB, 50 GB doesn’t need to be backed up, and the rest is empty.
The little 111 GB (usable) backup drive that I created when I stuffed the Fujitsu MH2120BH disk that came with my MacBook Pro into the vacated Verbatim enclosure that donated its Western Digital WD3200BEVT to my laptop was enough for a while. But this wouldn’t be enough for long: Time Machine currently takes up 103 GB to store a month and a half worth of my system backups.
Since I already had a 160 GB Maxtor OneTouch Mini 4 USB drive sitting around half full for Windows backups, I decided to swap the disk drive units between enclosures to get an extra 40 GB for Time Machine. It turns out the Maxtor used a Seagate ST9160821AS drive, by the way.
Why not leave the drives in place and just use the Maxtor for Time Machine? Three reasons:
- FireWire is substantially faster than USB 2.0 (as I’ll show in a future post)
- My MacBook has just one USB port that would work with the Maxtor, and I like to leave the Time Machine drive plugged in when I’m home, which would leave me with a hub (which I don’t have) or only a single USB port for everything else
- I’m a nut and love to rip things apart and tinker with them
Most people will probably want to just go out and buy a bigger disk.
Moving Your Time Machine Data
Let’s say you have an old (full) Time Machine disk and a new (empty) one and you’d like to preserve your old backups. Here’s how to move the Time Machine data without losing anything:
- Turn off Time Machine with the big switch in the Time Machine System Preferences panel.
- Eject the old Time Machine disk, unplug it, and re-insert it to force it to re-mount as a regular drive.
- Use Disk Utility to wipe the new drive completely. Give it a single partition (I chose MBR since it’s a removable drive, but it shouldn’t matter Apple recommends using GUID partition maps to avoid Time Machine trouble!) and a new empty filesystem. Time Machine requires the filesystem to be of the type, “Mac OS Extended (Journaled)”.
- Give the new drive a unique name so you can keep them straight when you’re copying. I recommend calling it “New Time Machine Drive” or something equally unambiguous. I called mine “Verbatim 160” (even though it was still in the Maxtor case), while my old drive was called “Verbatim”.
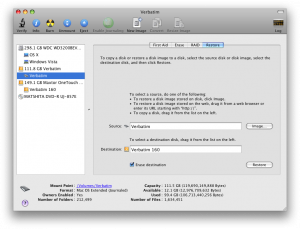
- Plug both drives into your Mac. You should see both in the Disk Utility sidebar. See my example at right, showing both “Verbatim” and “Verbatim 160”.
- Select the “Restore” tab in Disk Utility. This built-in OS X application can create a perfect block copy of your Time Machine drive, no third-party tools required.
- Drag your old drive from the sidebar to the “Source” box.
- Drag your new drive from the sidebar to the “Destination” box.
- Click “Restore” and observe the warning – this will copy all data from your old Time Machine volume to the new drive, destroying its contents!
- Wait a long while (mine took 4 hours) as the copy and verification progresses.
- Once it’s done, unplug the old drive and turn Time Machine back on. Make sure that it located the data on the new drive by clicking the Enter Time Machine item in the dock and looking at your old data.
- Consider telling Spotlight not to index this new drive or at least the “Backups.backupdb” folder.
- Once you’re satisfied that the new drive is working, you may want to use the old drive for something else. If so, turn Time Machine off again, plug in only the old drive, and erase it with Disk Utility. Don’t switch back and forth between the two Time Machine drives or you will become hopelessly confused!


So there you have it! Move your Time Machine backup data with ease, using only OS X’s Disk Utility! This tool is amazingly good, making me wonder why anyone would need a third-party product.
Update: See Rolfje’s blog for streamlined Time Machine migration steps.
Problems
If the Restore process reports “Could not restore – operation not permitted“, you have to eject the Time Machine drive and re-mount it after you turn off Time Machine (see step 2).
If it still doesn’t work, try a reboot.
If it still still doesn’t work, try checking the “Erase destination” box in Disk Utility. This forces a block-level copy rather than just copying files.
Great advice – thanks. In my case, going from a 500 GB drive to a 2 TB drive, it took the Disk Utility seven (!!) hours to copy and and verify the data. Yipes. But all worked fine after that. I wrote it up on my blog at http://gravitationalpull.net/wp/?p=716
Good advice. Mac OSX rocks.
That was easy – thanks for the step by step tutorial, it works great!!!!
Microsoft missed the boot on disk formats!
After remounting and selecting Erase Destination, it’s working! Awesome, I love Macs!
Thanks for the tutorial!
And that should have read BOAT not BOOT…
I’m upgrading a 12″ 1.33 G4 iBook with a new 160GB drive and (before I read this) started by formatting the drive with the disk utility and now I’ve got time machine sending all the old data to the new drive (connected with a USB cable to a portable drive case). My plan is to take the new disk with all the backed up stuff and install it right into the computer. After reading your article, it seems like I should have just put the blank disk in the computer and used the OSX disk to reinstall everything from another time machine drive. Whatd’ya think? Am I wasting my time?
Thanks so much for this write up and for including the problems section which I needed. Took the afternoon to copy over, but everything appears fine.
“And that should have read BOAT not BOOT…”
If you’re canadian, it works just as well. 😉
I bought a 500g drive to copy my 500g Time Machine drive to. My source partition was 499.97 Gb and the destination was 499.71 🙁 . Because of this the destination drive wasn’t large enough to take the restore even though I only had 450Gb of data on the source drive. It wouldn’t allow me to continue with the restore. What I was able to do is click on the source drive and adjust the partition size down to 499.31 which is now small enough to fit on the new drive.
my old drive will not stick in the source line? I have tried dragging it over and I dont get a plus sign??
I unmounted, remounted, turned off TM etc? Advice?
click the level below the actual drive, then you can drag it over.
click the level below the actual drive, then you can drag it over.
I followed your tutorial to the letter, but got the error message:
“Could not restore – Operation not permitted”
I am transferring data from a 250GB external harddrive to a new completely zero’ed 1TB Iomega external harddrive, this is what my log says:
2009-12-27 17:12:32 +0000: Restore Disk
2009-12-27 17:12:32 +0000: Source: “Darkers HD”
2009-12-27 17:12:32 +0000: Destination: “Untitled”
2009-12-27 17:12:32 +0000: Erase Destination: No
2009-12-27 17:12:32 +0000:
2009-12-27 17:12:32 +0000: Starting Restore…
2009-12-27 17:12:32 +0000: Validating target…
2009-12-27 17:12:32 +0000: done
2009-12-27 17:12:32 +0000: Validating source…
2009-12-27 17:12:32 +0000: done
2009-12-27 17:12:32 +0000: Validating sizes…
2009-12-27 17:12:32 +0000: done
2009-12-27 17:12:32 +0000: Copying
2009-12-27 17:14:01 +0000: could not copy /Volumes/Untitled/Backups.backupdb/Mac/2009-04-15-054708/Macintosh HD/Applications/Adobe Acrobat 7.0 Professional/Acrobat Distiller 7.0.app/Contents/Frameworks/AdobeACE.framework/AdobeACE; Operation not permitted
2009-12-27 17:14:01 +0000: Bom copy exited with error 1
2009-12-27 17:14:01 +0000:
2009-12-27 17:14:01 +0000: Could not restore – Operation not permitted
2009-12-27 17:14:02 +0000: Could not restore – Operation not permitted
2009-12-27 17:14:02 +0000:
Any help would be appreciated.
I had a similar error today but finally got it to work. Not sure if this will help you but it’s the only thing I did differently.
I had initially selected my original HD (in the left column) and clicked on the Restore tab not thinking it would make a difference since you drag and drop the source and destination anyway. When that scenario provided the error, I instead selected the new HD in the list at the left and used the Restore tab from there. Probably a silly mistake but hope that is all it is for you.
i have tried to do this but the destination partition is to small. my old drive alows me to alter the size of partition but my new one doesn’t. any ideas on how i can alter the size of the parts to my new hd without erasing the data..i have just spent 2 days transferring filesand don’t want to loose any more time… help please
15 hours for a 1TB->2TB migration
Hi,
instructions are clear, and the process easy. But it does not work for me. It stops restoring issuing the message “Descriptor not valid” (approximate translation from Italian). Reading the log I found this message:
“Catalog file on image/volume is too badly fragmented”
It concerns the source. I tried to fix the disk from errors, but no difference. Any suggestion?
Thanx
Marco
It worked! Well, not at first. I had to follow the secondary process:
Select the destination disk and then the source and then elect to erase the destination disk. After three tries that was the trick to get it to go. It preserved my 300 gigs of archived material and started up like it had never changed disks.
Well, how do I move time machine backups from one NAS to another NAS?
great tutorial Stephen! Works perfectly for me the 1st time! thx!
great piece of info – ensured erase destination was checked straight of the bat as that seemed to make good sense – and after a few hours of my mbp being left alone, time machine backups neatly migrated to new backup media… Cheers ta.
I have tried 4 times to get this to work. First three came up with “Could not Restore. Operation not permitted”. I went back and reformatted the destination HD. This time though I formatted both the mounted volume and the disk image. It went through the whole process and then came up with “Could not restore – Cannot allocate memory”. I have the log report and snapshots of the DU screens. Can you help me?
Hi,
I was just wondering if this method of copying Time Machine data would be suitable for the time machine partitions of a dual external hard drive system where I would have two external drives, each with say, three partitions: one for time machine, one for a bootable clone, and one for other data (eg movies/photos/music).
The plan is to rotate the drives on a weekly basis. This would enable me to:
a) keep TM backups going when I’m off-site,
and,
b) ensure that if one of the drives fail (as my precious iomega ultramax did a few weeks ago!), that I would only lose at most 1 week’s worth of data.
My main worry is that making a block-by-block copy of the original TM drive and then using BOTH the original and copy drives could somehow screw up the directories, etc, especially if both drives happen to be connected at the same time for copying other data.
Any ideas??
I would be using a desktop external HDD connected by USB and a portable HDD connected by FW if this makes any difference??
Oh my gosh! Thanks Stephen.. life saver of a tutorial. Been wondering how I was going to upgrade my HD’s and move all the old TM files over to the new drive…
Worked like a charm, even from Stable Snow Leopard to ‘Lion’, I have all my TM backups on a much roomier drive. Thanks for such clear and concise instructions.
Hi, The best article for this subject. Easy and clean. Thanks!!!
What if the old time machine drive has other content ? My drive has three other folders with movies and data. I don’t really want to clone all that garbage too …
I don’t dare to try to move backups to a new disk, for I’m worried that the backup will be damaged somehow and will not work when it’s urgent.