If you’re a real hacker, you’re interested in all sorts of tech, from computers and the internet to radio to airplanes. The intersection of all of these interests is ADS-B, the protocol used by aircraft to share data like position and speed. Widespread availability of cheap software-defined radio (SDR) receivers and cheap computers like the Raspberry Pi makes it easy for anyone to join a global network sharing ADS-B data. Read on to learn how to build your own ADS-B receiver for under $100 and get involved!
A Little Background on ADS-B
Although it has a creepy name, Automatic Dependent Surveillance–Broadcast (ADS-B) is pretty cool. Most countries now require all aircraft to broadcast flight data, including position, altitude, speed, and heading, using a standard digital packet-based protocol. This data comes from on-board GPS receivers and other instruments. Larger, high-flying aircraft send these once per second at 1090 MHz. The goal of ADS-B is to augment or even replace radar as the primary means of coordinating flights and avoiding accidents.
Essentially, ADS-B lets receivers “see” every aircraft in the sky, and this data is used by pilots, air traffic control, and many others besides. Take a look at FlightAware and you’ll a real-time visualization of ADS-B data from thousands of receivers all around the world. But this data isn’t just collected and used by companies like FlightAware: A network of independent enthusiasts is also collecting, processing, and sharing this data. This was exemplified by ADSB Exchange, but after they were purchased by a for-profit company the task was picked up by ADSB.fi and others.
As mentioned, all aircraft are required to broadcast ADS-B data, including private and military planes. But FlightAware and similar services only focus on commercial traffic, filtering out everything else. Wouldn’t it be interesting to see everything?
Software-Defined Radio and the ADS-B Community
A few years back, cheap USB TV tuners began appearing on the market. But hardware hackers quickly noted that the RealTek RTL2832U ASIC could receive much more than TV data. Indeed, custom software could enable this little chip to receiv data across the spectrum, including weather, emergency services, and even satellites. A whole world of hobbyist software-defined radio (SDR) applications was opened up!
It’s important to note that this chip is receive only. In other words, it can “listen” to nearly any frequency but can not transmit. There is no risk of interfering with fire fighters, astronomers, or air traffic controllers. And the USB device needs software and supporting hardware to function.
Thankfully, the ubiquitous Raspberry Pi has plenty of horsepower to support most SDR applications, and free software is widely available. Applications like Dump1090 can extract and decode data transmissions from the RTL SDR device, making ADS-B data widely available and usable. This has been embraced both by FlightAware and by a broad international community. There are literally tens of thousands of independently-operated ADS-B receivers collecting and sharing this data all around the world.

Build Your Own ADS-B Receiver!
If you’re interested in exploring this community, it’s easy and cheap to build your own ADS-B station, using an RTL-SDR dongle and a Raspberry Pi. It literally took less than half an hour for me to start receiving data and sharing it with FlightAware and ADSB.fi! I’m going to list the simple steps here, but I encourage to to get involved with the community if you want to go deeper or try a different solution.
What you need:
- A Raspberry Pi – including appropriate power supply and SD card (I used a Model 3B that I had laying around)
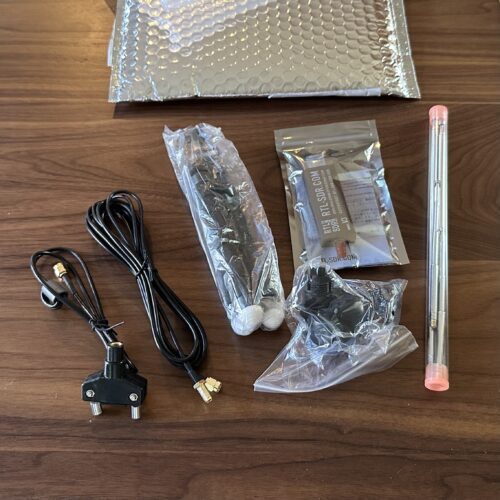
- An RTL-SDR dongle – I bought a kit from rtl-sdr.com and had it shipped direct from China but it’s also available from Amazon (watch out for fakes!)
- An antenna – The RTL-SDR kit I bought came with an antenna that works fine
- Software – Raspberry Pi OS Lite, PiAware, adsb-fi-scripts (there are a lot of software options but this works)

What to do:
- Set up the Raspberry Pi
- Install Raspberry Pi OS Lite (bullseye 32-bit) on a micro SD card
- In raspi-config, configure localization, enable SSH, and set up Wi-Fi
- Install fail2ban, add your ssh keys, and disable password-based and root login
- I strongly recommend using an official Raspberry Pi power adapter, since generic ones often lack sufficient power and you’re going to have a juice-sucking USB device permanently attached and running!
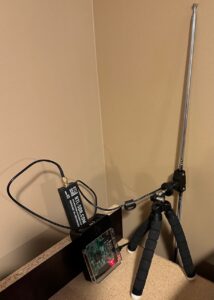
- Connect the RTL-SDR dongle and antenna
- Plug the dongle into any USB port on the Pi
- Screw the antenna base cable to the dongle
- Attach the long antennas to the antenna base
- Arrange the antennas in a “T” shape but do not extend them further
- Attach the antenna base to the tripod and arrange it so the antennas are vertical (pointing up and down)
- Place the antenna near an outside wall, as high up as possible
- Set up the ADS-B software
- Download and install the piaware-repository, dump1090, and dump978 per the instructions from FlightAware
- Reboot and you’re in business! Go to raspberrypi:8080 to see a web interface on your device!
- Register for a FlightAware account and claim your PiAware instance to get a free Enterprise account
- Install the adsb-fi-scripts per their GitHub to also send data to ADSB.fi
- Install their local interface too (step 4 in the GitHub) and visit raspberrypi/adsbfi/ to see their graph
You will be tempted to stretch the antenna all the way out and arrange it like a “V.” Don’t do this. Antennas are bizarre witchcraft. A quarter wavelength antenna at 1090 MHz is just 65.3 mm (2.57 inches) and a half wave (twice this) is roughly the length of the longer metal antenna in the kit. That’s the longest antenna you want! And it’s best to orient it straight up and down (like a sideways “T”). Just do this for the time being until you’re ready to nerd out about the antenna.

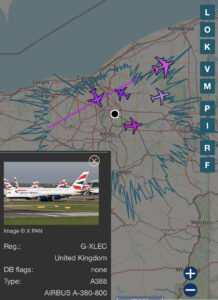
I love that the ADSB.fi interface generates a coverage map for you, as seen at right. It’s a rough indication of how far your rig can see, and is regenerated every time you boot. I recommend setting everything up and letting it run for a few hours in various spots around the house to fine the most convenient and effective spot. I did exactly this and my ADS-B station now covers most of Northeast Ohio! I’m tracking 13 aircraft and receiving over 80 messages per second as I type this.
What’s The Point?
Although I was excited enough about the prospect of my own ADS-B receiver to but the SDR dongle and set it up, I can imagine some people might be confused. What’s the point of tracking planes? I gave that a thought:
- The hacker ethos is all about seeing the unseen and investigating the unknown. It’s fun to slap together a few bits of hardware and software and have it do something unusual.
- Because ADS-B is not encrypted or authenticated, some have suggested it could be spoofed or hacked. A proliferation of independent ground stations and robust data collection and processing can help detect or prevent this, keeping everyone safer.
- If you’ve ever heard a plane and wondered what it was, nothing beats having your own receiver! Within 12 hours I spotted (and heard) a Canadian CC-130, an American E-6 Mercury, and a rescue helicopter, and none of these were listed on the commercial flight tracker apps!
- Nerds love radio, free software, and airplanes and this brings it all together.
- Hey, free Enterprise-level FlightAware account?
Yes, FlightAware is a for-profit company and they are selling the data I’m collecting. But I’ve used their data for free for years, and am ok with this trade. Plus it’s simple to contribute to the open community at ADSB.fi at the same time!
Stephen’s Stance
This whole process took about 30 minutes from unpacking to planespotting, plus a few hours tinkering with antennas. It’s a great way to explore the world of software-defined radio (SDR) while contributing a useful data source. Plus it’s fun to know what that plane was!
Wow, those Raspberry Pi boards are expensive compared to Arduino.