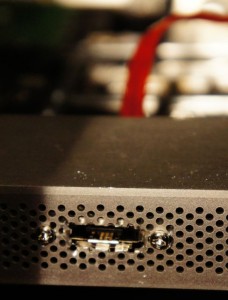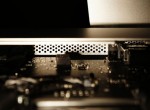
My late-2009 27″ Intel iMac now has an eSATA port. I’m documenting how I did it here mainly for posterity. Although it works fine, I cannot recommend that others attempt to perform the same surgery on their own crazy-expensive Apple computers. eSATA mods like this won’t be satisfying to most users, and the operation is risky and destructive enough that non-crazy people shouldn’t attempt it!
Preparation: Options, Parts, and Courage
I suggest also reading my post, Four Ways to Add eSATA to Your iMac
The iMac is not meant to have an eSATA port. The case is fairly tricky to open, though once one gets the hang of it it can be accomplished in minutes. This is the first obstacle.
2009 models like mine include two SATA connections internally: One for the boot hard disk drive and another for the internal DVD SuperDrive. Mid-2010 models add a third SATA port, unused unless one specifies the expensive SSD and hard disk drive combination. So adding an eSATA port on a 2009 model means sacrificing the internal DVD drive. This is obstacle number two.

That DVD SuperDrive SATA cable is soldered to the back side of the motherboard, so the cable cannot (easily) be swapped for one with eSATA on the other end. This is the next obstacle. It uses a standard female slimline SATA connector, however, and I was able to locate and purchase an appropriate male SATA (data-only) to eSATA cable at CPUstuff. Get the 10 inch length.
Since this eSATA port will sit behind the aluminum vent grill at the bottom of the iMac, the longer connector on an eSATA 2.0 cable is required. You want a Serial ATA 2.0 Cable like this one not one of the more common plain-Jane eSATA cables with shorter plugs. Watch out for cable length, too. Although this is an eSATA port mechanically, it does not have the higher power (and thus extended reach) of a real eSATA port.
No other parts are really required, though you will probably want something to attach to your Mac. I’m using a simple Kingwin EZ-Dock EZD-2535 but it’s not anything awesome. I plan to upgrade my 4-bay Drobo to a Drobo S with eSATA for some real data protection and performance. I’d also like to try a SATA port multiplier like this Addonics AD5SARPM on the port to see if it works.
Before you consider following these directions, know that the result isn’t all that satisfying. Mac OS X doesn’t support hot-plugging drives on this port, so you’ll have to reboot whenever you want to switch them out. There are also some potential issues with moved or added temperature sensors causing the iMac’s fans to run more noisily.
Then there’s the real fear that you will damage your expensive computer. Although Apple should still support other parts under warranty, they definitely will not cover issues you cause while mucking about in your computer!
Performing Surgery
The eSATA mod is actually quite straightforward. We will open the iMac, remove the DVD SuperDrive, and attach the male SATA to eSATA cable to it. We will route this through a hole carved in the ventilation grille at the bottom edge of the iMac. Once we put it back together, we will have an iMac with an eSATA port and no DVD drive.
- Prepare for surgery
- Locate a broad, sturdy table and cover it with a soft cloth or two. You don’t want anything getting scratched or dropped.
- On a computer readily at hand, open up iFixit’s 27″ iMac teardown and use this as a guide
- You will need something to lift the screen glass. iFixit suggests strong suction cups, but I used a thin spatula.
- You will need a Torx T10 screwdriver, tweezers, and two paper clips to remove the LCD
- You will need a Dremel tool or other cutting device, along with a proper cutting disc and drill for use on aluminum
- You did buy that 10″ male SATA to eSATA cable, right?
- Open the iMac
- Place the iMac on its back with the top facing your body. Lift off the glass using suction cups or gently pry it up from the middle with a broad thin spatula. Set the glass somewhere safe, clean, and secure. Do not touch the inside of the glass!
- Remove the four screws along each side of the LCD panel and watch for the magnets that hold the glass in. Use the tweezers to grab the screws if you need to.
- Bend the paper clips into J-shaped grabbers and begin lifting the LCD panel from the case by hooking them under the exposed corners. Do not lift far!
- Reach under the panel and unhook the four cables connecting it to the motherboard. Now lift the panel clear and set it in a clean, secure spot. Do not touch the face of the panel!
- Unplug the DVD SuperDrive SATA cable as well as the temperature wire. Remove the four Torx T10 screws holding it in place and lift the drive out of the case.

I lifted the glass with a broad, slim spatula rather than suction cups - Carve the port hole
- Locate the spot where the eSATA port will be placed. The best place is about an inch from the RAM hatch on the DVD side of the case. Watch out for the black component on the motherboard a little bit outward from this!
- Carefully measure the port hole and mask it off with tape and cloth to keep aluminum dust from getting all over the computer.
- Pack the inside of that spot with cloth, too, to protect the motherboard from dust.
- Carve the long sides of the port hole using a cutting disc. I started with a diamond-coated disc but the aluminum case ate it up. I ended up using a fiberglass-reinforced cut-off wheel. It got very hot but did the job.
- Clip the short edges and pry the band of aluminum out of the case.
-

We'll clean that slot up a bit before installing the port Mark and drill the screw holes on either side. I used a standard sheet metal bit, but it was very hard to hold it steady so I attached the multipurpose cutting guide to help.
- Reshape and hone the opening to your satisfaction.
- Carefully remove the masking and clean out any dust.

We will locate our eSATA port between that black component and the RAM 
Drill, baby! Drill! - Install the eSATA port
- Position the eSATA port behind the aluminum grille and screw it into place.
- Connect the male SATA connector to the slimline DVD SATA connector. I used some electrical tape to hold it in place.
- Tape the connected ends to the back of the case to keep them out of the way.
- Pry the temperature sensor from the DVD SuperDrive and reconnect the wire to its port on the motherboard. Attach the other end somewhere in the space left by the removed DVD. I taped it to the back of the case. If you don’t do this the right-side fan will run full-speed all the time!

We taped everything into place to keep it out of the way - Reassemble the iMac
Stephen’s Stance
Don’t do this. I’m a storage guy, and I regularly test the performance of hard disk drives using my iMac, so it was worth it to me. I’m also pretty good with tools and computers, so I wasn’t worried about damaging anything. You’re probably not me, and you probably don’t want to go through all this.
Other World Computers (OWC) has a service offering to perform this exact modification to your iMac and guarantee the work. Although that’s much safer than performing surgery yourself, I strongly suggest that you consider whether you really want eSATA at all. eSATA is the fastest I/O channel an iMac can use, but Gigabit Ethernet and FireWire 800 are pretty fast, too. Although USB is too slow for some modern storage needs, even it’s 25 MB/s is plenty fast for most people.
Then there are the issues. Mac OS X appears to read the temperature sensor on some of my hard disk drives over SATA and run the internal fan faster (and noisier) to cool them off. But since they’re now outside the case, it can’t cool them so it just runs and runs. I have to power off the iMac and disconnect the SATA drive to stop this happening. And I can’t override the fans or tell it to ignore SATA temperature reports. So the only time my iMac runs quietly is when nothing is plugged into the eSATA port.
Mac OS X also does not support hot-plugging on these ports, and the “eject” icon is not displayed in Finder. One can eject through an option-click or right-click or using Disk Utility or diskutil from the command line, though. I have not yet located a way to tell it to rescan the SATA bus if a drive is connected or removed, so once a drive is ejected it’s time to reboot anyway. Sleep seems to do something for removed drives, but it doesn’t correctly read a new drive that has been attached. Any ideas or suggestions are appreciated here!
In summary, the risk is probably greater than the reward for most people. Get a FireWire 800 device with RAID and call it a day, or upgrade to a Mac Pro or Hackintosh if you need more internal storage. But watch this space for news and updates from me!
Did you try any of the software Fan controllers to re-gain some control over the fans? Did that work? How do you feel about this now? I am really wanting to try it but kinda worried about the fan issue.
Hi,
To avoid fan running wild, i just replaced the optical drive, extended the esata port, and used aluminum adhesive and glued the optical drive temperature sensor to body. The optical drive of late iMac 2009 is external censored. So system gets all temperature right. And is is quiet and fast. 235 MB/Sec Blocksize 256k.
Just wanted to share
Hi:
Did you tried port multiplier after the eSata install?. What should you recommend?. I’m looking for a eSata port multiplier but not for a raid system, I just want more than 1 eSata port for my late 2009 iMac 27”. Thanks
Stephen congratulations for your mod i want your help.I have iMac 2010 SSD + HDD and i want to remove HDD to put eSATA what i will do with temperature sensor???
Hi Stephen,
Thanks for all the info.
Do you know if it’s possible to do this to an iMac late 2008?
Best wishes
Andy
Hi,
I am curious about your approach. Can you provide a link with some information regarding the optical drive sensor, aluminum adhesive and any other modifications you may have made to Stephen’s approach?
Thanks for sharing.
http://www.xlr8yourmac.com/systems/imac_esata_mod2/imac_estata_mod.html
Above is interesting link where someone added 2 ports to their imac and looks like they kept optical drive connected.
Hope it helps.
You Need to install this software for your fan problem http://www.hddfancontrol.com
Spatulas Suction cups.. you can do it with your nails Quite easly on 27inch the 21.5 its a bit harder…
Please can you make a video for us ? That will really help a lot