With the current turmoil at Twitter, many people are turning to the federated social media network built around Mastodon as their new social outlet. Once I started posting there, a few old friends asked me to share my #SymLink, #PackRat, and #GoodRead links on Mastodon, since they enjoyed reading the contents. Since my posting process is entirely automated using Zapier, I automated posting to Mastodon using it as well. Here’s an easy way to add automatic posting to Mastodon using Zapier!
Warning: Tread Lightly!
Mastodon is not Twitter!
People will not take kindly to a flood of spam coming from your account and will block you. Quickly. They might even block your whole server, which will quickly get you kicked off by your admins.
I strongly suggest (nay, demand) that you establish your account, learn the social norms of your Mastodon instance, and play nice with the people there.
In fact, I thought about not sharing this at all. But frankly it’s so easy anyone could figure it out, and Dr. Drang already shared his python method. At least if I post it I can include the above warning.
Do not use this power for evil!
What You Need
In order to auto-post to Mastodon using this method you need to prepare a few things:
- You need a functional account on a Mastodon server that allows API access (I use Hachyderm.io)
- You need to set up a new application with API keys (see below)
- You need a functional Zapier account at Starter level or above (which costs $19/mo currently) so you can use their “Webhooks by Zapier” action
- You need some other source of data to auto-post (I have a very complicated setup that shares based on starred RSS items in Feedbin)
Again, be aware that auto-posting might violate the terms of service on your Mastodon instance or annoy the community there. Be careful.
I won’t walk you through getting a Mastodon account. I suggest finding a server in the public directory and signing up for yourself! And while you’re at it, maybe give me a follow! I’m @[email protected]
Get Your API Keys
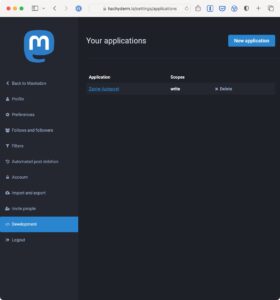
Most Mastodon servers allow you to set up applications. Assuming they’re using the official Mastodon software, here’s how to do it:
- In the web interface, go to your account and drop down the menu next to your name
- Select Preferences
- Click Development
- Click New application
- Enter an Application name like maybe “Zapier Autopost”
- Leave everything else as-is and click Submit (you could limit it to write if you want)
- Click your new application name in the list and note Your access token
That’s it. All you need is the access token for your new application. No need to mess with anything else.
Set Up Zapier
Zapier is very powerful but the interface has gotten more and more annoying and slow every year. Still, it works pretty well. I imagine you could do pretty much exactly the same thing using any webhook automation on any other platform. Leave a comment if you figured it out on some other site!
Here’s how to automate posting in Zapier:
- Build a Zap that gets some sharable data from somewhere. Maybe an RSS feed of your favorite reader app.
- Add “a step “Webhooks by Zapier” as an output step
- Select “POST” as the Event
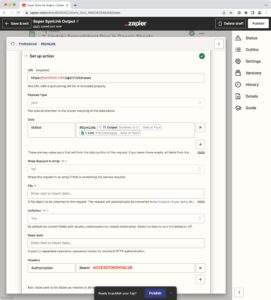
- In Set up action enter the following:
- URL is the webhook URL for your host. e.g. “https://yourhost.com/api/v1/statuses”
- Data key is “status” and value is whatever you want to share (from the input source or other Zapier steps)
- Headers key is “Authorization” and value is “Bearer XXXABC123” (where XXXABC123 is your access token from above)
And that’s it! Zapier even gives you the URL of your post as an output if you want to record it somewhere.
Advanced Stuff
You can customize your post a bit more, and probably should.
- Add a “spoiler_text” string in Data to create a so-called content warning (for example “Automatically Posted”)
- Add a “visibility” string in Data to restrict who can see your post – use “direct” when testing so no one else sees it, and try “unlisted” for less-public things. The default is “public” but you can also use “private”
You can also add media to your post! This requires a webhook run to upload the media prior to adding it to the status. The POST to upload the media is similar to the one above:
- URL is the web hook URL for media posting, e.g. “https://yourhost.com/api/v1/media”
- DATA key “description” is optional but recommended
- FILE is the URL of the media you want to upload
- HEADERS “Authorization” is as above
The webhook post will return an ID of the media which can then be added to the status post immediately after. In Data add a key called “media_ids[]” with the value being the media ID from above. This will attach the media to the status post.
Stephen’s Stance
Auto-posting to Mastodon using Zapier is so simple I feel bad writing an entire blog post just to say how easy it is. Honestly, Mastodon is really refreshing compared to Twitter, and I hope that automatic posts and bots won’t take over the place. But if they try, I hope users and admins will block them. I wouldn’t be doing this if my friends didn’t miss my Symbolic Links and Good Reads!


Thanks for posting these instructions. It mostly worked for me. I was able to post something with an image from zapier. However, I can’t get the description on the image to show up. The response from the server always returns “description=null” no matter what I put in the data “description” field. Any ideas?
Can you share a video on how you did it? I’m a little confused on where to get the URL portion
Webhooks are only in the pro version, just for information!