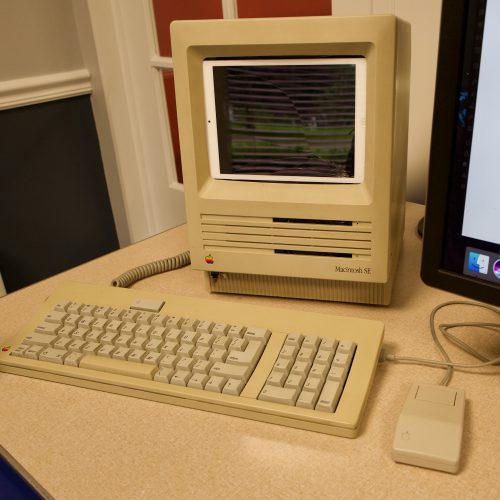
I recently built the biggest, clunkiest iPad mini case ever, transforming my old Macintosh SE case into an iPad stand. But what to do with that empty case? Why, it’s the perfect size for a custom Mini-ITX PC! Introducing my liquid-cooled Core i7 monster Mac SE!
Creative Packaging
After removing the original Macintosh motherboard, I was struck by its neat packaging in the Macintosh case. The motherboard sat at the bottom, with air venting in all around. Most of the space above was taken up by the CRT, power supply and related analog electronics, with a bit of space reserved for the two 3.5″ drive bays and processor-direct expansion slot (“SE” stood for “System Expansion”!)
Apple’s original motherboard is just a bit larger than a modern Mini-ITX motherboard, and the removal of the CRT left a considerable amount of space inside for other components. I immediately knew I could fit a whole PC, including a small power supply, inside that case. Still, it took some creative packaging to get everything oriented correctly.
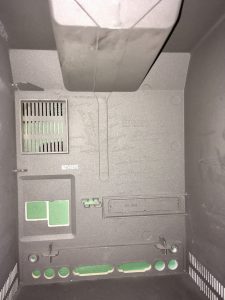
One thing that became immediately obvious is that none of the original port cutouts would line up with a modern PC motherboard and power supply. I could have cut out the entire lower panel, but I wanted to keep the case as stock-looking as possible. So I decided to orient the motherboard vertically, using short cables to relocate the ports to the original holes. I mounted it “ports up” so it would be easier to reach the ports and to make use of the space alongside the integrated handle.
I also discovered that a modern SFX or TFX power supply would almost, but not quite, line up with the existing holes, so some Dremel cutting was inevitable. I enlarged the power cutouts so I could mount my Corsair SF450 SFX power supply vertically. Although this blocked the original printer, modem, and audio port, it left room for the rest of the PC inside. I also cut out a few intruding plastic tabs inside the case to make a cleaner space to work with.
The popularity of the Mini-ITX form factor opens many doors for this kind of project. Everything is available in this compact size, from fanless media devices to servers to high-performance desktop PC’s. The only trade-off is that just a single PCI Express slot is allowed. This wouldn’t pose a problem with this build, but it could be an issue for others1.
Building my “Hackintosh SE”
I decided on the Gigabyte GA-H110N, a socket LGA1151 board with lots of amazing features in a tiny package. Of note, this motherboard includes a bonus Mini PCIe slot (for a wireless adapter) and a super-fast M.2 socket on the back for an NVMe SSD. It supports the whole range of Intel’s current Skylake CPU‘s and dual-channel DDR4 DIMMs. I paired this with Intel’s 4 GHz Core i7-6700K CPU2, 16 GB of RAM, and Intel’s new 600p NVMe SSD3. I bought all this at Micro Center for under $775 (much cheaper than online!)
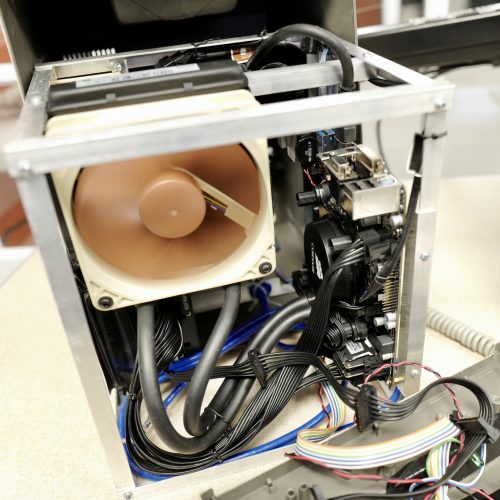
I mounted the PC components in an aluminum frame, making the whole thing easy to pull out and work on. I bought two 4-foot pieces of 1/2-inch angle aluminum and cut them to size with a hacksaw and Dremel cutting bits4. I carefully fitted each piece into the Macintosh case as I went along, making sure it would fit snugly and securely and that all the PC components would fit as well. The motherboard is mounted on conventional brass stand-offs screwed into this aluminum frame.
The original Macintosh was passively cooled, but the Mac SE added a small rear-mounted fan5. Although this means the case is designed with convection cooling in mind, a blazing Core i7 needs a little more chill power. So I decided to use a Corsair H55 liquid cooling unit to pull the heat off the CPU. This liquid cooling setup is also lighter and more durable in a portable case, putting less stress on the motherboard and CPU.
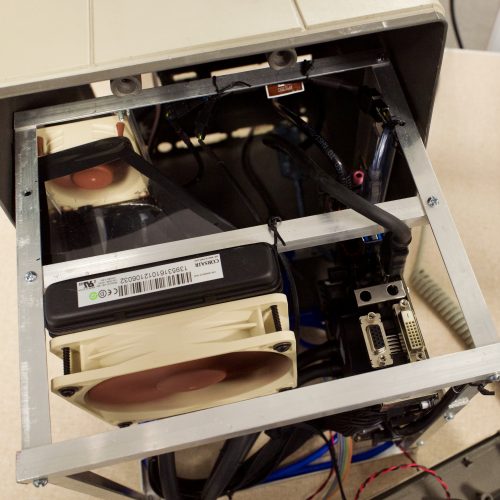
The liquid cooler also let me design a better cooling solution. After experimenting a bit, I added two excellent Noctua fans and a custom plastic box to direct air out the original vent. The larger NF-P12 is optimized to force air through the radiator, while the smaller NF-60X25 runs at higher speed, forcing air out the vent. Although not visible, this airbox extends down to the SFX power supply as well, pulling hot air out along the side of the case.6
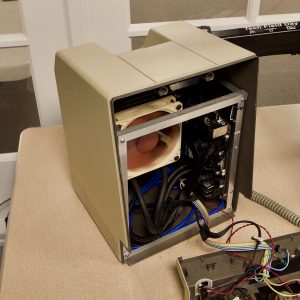
The entire PC fits nicely in the original Macintosh case, with a wiring harness “borrowed” from an old PC for power switches and lights. I’m still working on mounting this wiring7 but for now the power switch pokes out where the brightness knob once sat. I plan to use the original Macintosh speaker as well but have mounted a PC speaker for the time being.
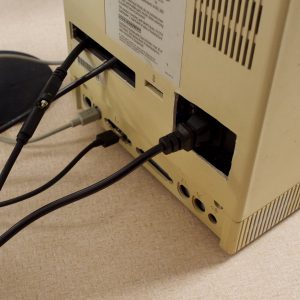
I’ve mounted a USB3 header to the original floppy port, attached to the frame. I have also embedded a Griffin iMate USB to ADB adapter in the ADB port cutout, and am happily using the original Apple Standard Keyboard and Mouse on a daily basis. Although I bought an HDMI extender cable with a panel mount jack, I have not yet mounted it in the printer port.
Stephen’s Stance
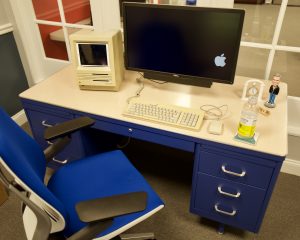
Since I still have the iPad mini in the Macintosh SE case for video conferencing use, I’ve attached the “Hackintosh SE”8 to my 27-inch Dell 4K display. It might seem odd that the Macintosh “monitor” isn’t attached to the PC inside, but it’s not an issue in daily usage. And it would be awfully hard to go back to a 9-inch monitor after getting used to the lovely Dell panel!
Now that everything is up and running for a few weeks, I can report that my Hackintosh SE is stable and stays cool even under heavy load. I stressed the CPU to maximum for over a week using a zcash mining application and it sat at 60º C at a full 4 GHz all that time. The exhaust air doesn’t even feel that hot!
Perhaps I’ll write more about the software side of things, but that’s working pretty well too. I still haven’t gotten the video resolution right and it took some serious “doing” to get macOS booting from the NVMe SSD, but it all works now. And it’s blazing fast and stable too!
Want more details? Leave me a comment!
- I did discover some nice dual-slot Micro-ATX boards that might have fit as well ↩
- I wouldn’t need the boxed heatsink, so the “K” CPU made sense even without overclocking ↩
- This isn’t the best SSD, but you get a lot for your money ↩
- I went through about a dozen cutting bits. Buy a big package! ↩
- Steve Jobs apparently hated having to add a fan to the Macintosh, but it got awfully hot in there with only passive cooling ↩
- There is also enough room for a PCIe graphics card to be attached, should I want to do that in the future. If I did this, I would likely modify the cooling system to vent the graphics card heat directly out of the case through the airbox or the existing expansion slot cover. ↩
- I plan to use the programmer’s switch to operate the buttons ↩
- Yes, it runs Mac OS X Sierra ↩
Best MacGyver story ever.
cool but with out the real monitor its kinda of a waste
Where’s the graphics card?
This is dope. I would recommend turning the macintosh display into a stats display for internals like temp, fan speed, ram usage, etc. would be sick.