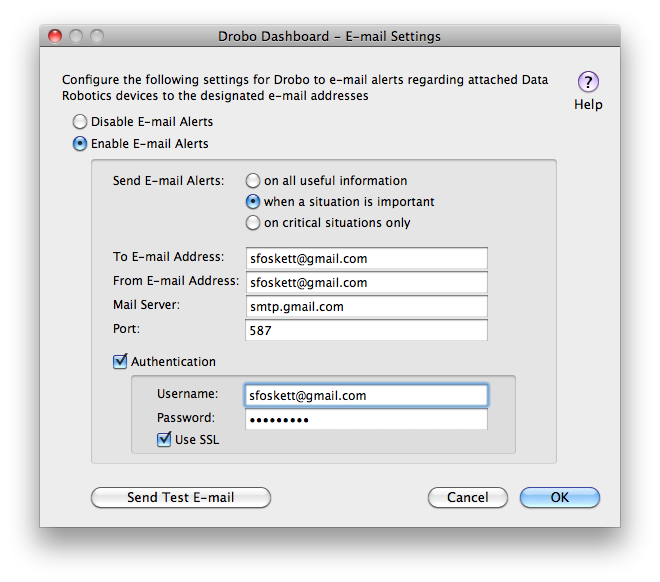
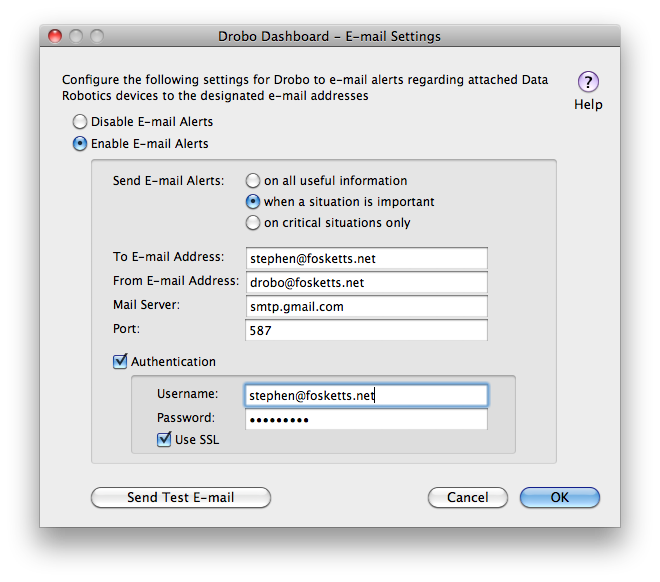
One of the cool automatic things that the Drobo “storage robot” can do is send you an email when it wants your attention. Well, to be more accurate, The Drobo Dashboard software on a connected PC or Mac sends the email, but you get the point. But if you’re like me and use Google’s Gmail as your email system, you might be wondering just how to configure Drobo Dashboard. Here’s a quick guide to get it all working!
Drobo Email Basics
In keeping with the Drobo “simplicity” mandate, there are just a few decisions to make regarding Drobo Dashboard email:
- How much email do you want? Drobo Dashboard can send messages for general information, when an important event arises, or only in critical situations. I selected the middle (default) setting.
- Where should the email go? You can put in any address you like (perhaps you have a special account for high priority mail) but I decided to send to my regular email address.
- Who should the “sender” be? You can enter any address you like, but I decided to use a special (but non-existent) “[email protected]” address so I can filter the messages with Gmail.
Get started by selecting “Email Settings” from the Drobo Dashboard menu, then follow the steps below!
Note that the email messages will be sent from Google, but can be sent to any account. Use these steps regardless of which account you are mailing to.
Configuring Gmail

If you’re using basic Gmail service (ie, your address is “[email protected]”) you should fill in the fields as follows:
- Enter your own address as the “To E-mail Address”
- Enter anything you like as the “From E-mail Address”
- Enter “smtp.gmail.com” as the “Mail Server”
- Enter “587” as the “Port”
- Check the “Authentication” box
- Enter your valid Gmail address as the “Username”
- Enter your valid Gmail password as the “Password”
- Check the “Use SSL” box
Now just click “Send Test E-mail” to make sure it works. If you get the message, click OK and you’re done!
Configuring Google Apps

Google Apps users might be confused what to enter where. But it’s really no different than basic Gmail! Just fill in the fields as follows:
- Enter your own address as the “To E-mail Address”
- Enter anything you like as the “From E-mail Address”
- Enter “smtp.gmail.com” as the “Mail Server”
- Enter “587” as the “Port”
- Check the “Authentication” box
- Enter your valid Google Apps email address as the “Username”
- Enter your valid Google Apps email password as the “Password”
- Check the “Use SSL” box
Now just click “Send Test E-mail” to make sure it works. If you get the message, click OK and you’re done!
Thanks for this, I had the port number set incorrectly, but 587 worked like a charm!
Thanks for this, I had the port number set incorrectly, but 587 worked like a charm!
wow! pretty amazing. This is really helpful to organize gmail and google apps. it makes easy to organize everything in the gmail. I recently learn how to Crack Gmail passwords. Amazing too.
Thanks for this. I had my Drobos set up to email me, but then it stopped working. I’ve updated my settings, and we’re back to good.
I know I could have searched a Google Forum for this, but your pictures and format were just *that much* easier and came up in higher in my search. What I mean to say is thank you! I wouldn’t have been sure, until I saw such a well written and intuitive guide. I’m gonna check out more of your work. Keep it up!